JChandler82
Well-Known Member
- Thread starter
- #1
Hello Z lovers!
I wanted to share my experience and the path I took installing a subwoofer in my 2024 Z. There are a few other threads out there with pieces of this information—which were very helpful—but I couldn’t find a single place that walks you through the entire process from no sub to a fully installed system (annoying your neighbors included ).
).
Disclaimer: I am NOT an audio expert by any means, and I don’t claim to know even 1% of what a professional installer does. I’m an IT guy who enjoys big bass and DIY’d my way to it. I’m very happy with the results and just want to share my experience so others can tackle this themselves if they choose.

Parts List:
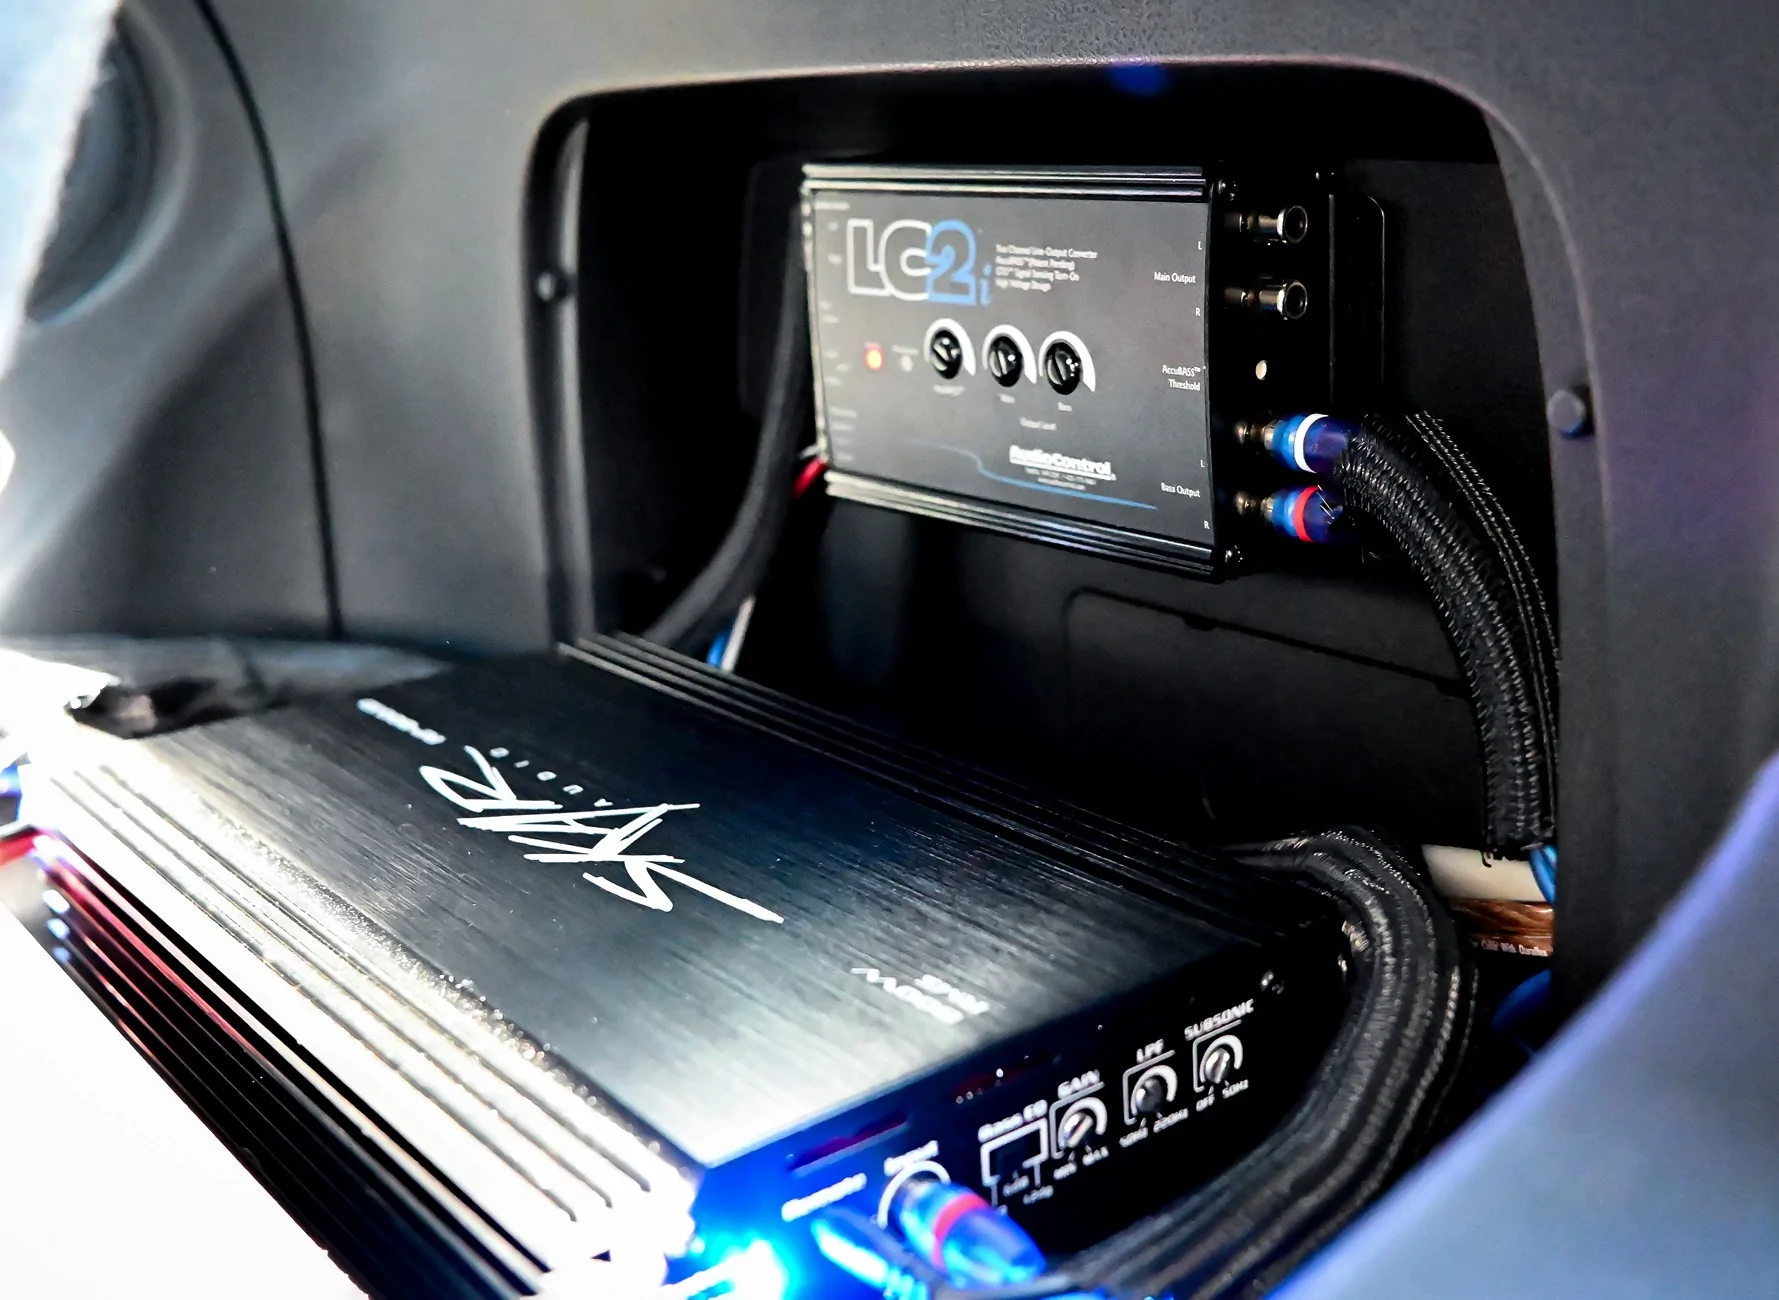
Line Output Converter (LOC)

I started with the LOC. First, I tapped into the factory Bose speaker input (this signal is modified by the factory amp). If you want a cleaner, unmodified signal, you can tap into the speaker wires directly from the head unit before they reach the Bose amp. That said, I’m happy with my current sound and don’t plan to change it.
I used Posi-Tap connectors to tap into the wires. Looking at the plug connecting to the factory installed Bose spare tire sub, the top two wires are positive, and the bottom two are negative. I initially tapped all four wires before realizing that only one set is needed for my LOC.


Note: These are NOT T-tap connectors. While T-taps may work for some, they’re not recommended due to potential connectivity issues.
After making the connections, I ran the extended speaker wires to the LOC.
If you don’t want to tap the connections, you can buy a wiring harness adapter from OWC Upgrades: Z (2023-2025): Audio Interface Harness Adapters, PLATINUM SERIES | OWC Upgrades
For power, I used a 12V cigarette lighter fused adapter. There are several ways to power your LOC:

Next, I ran the 4-gauge power wire and ground.
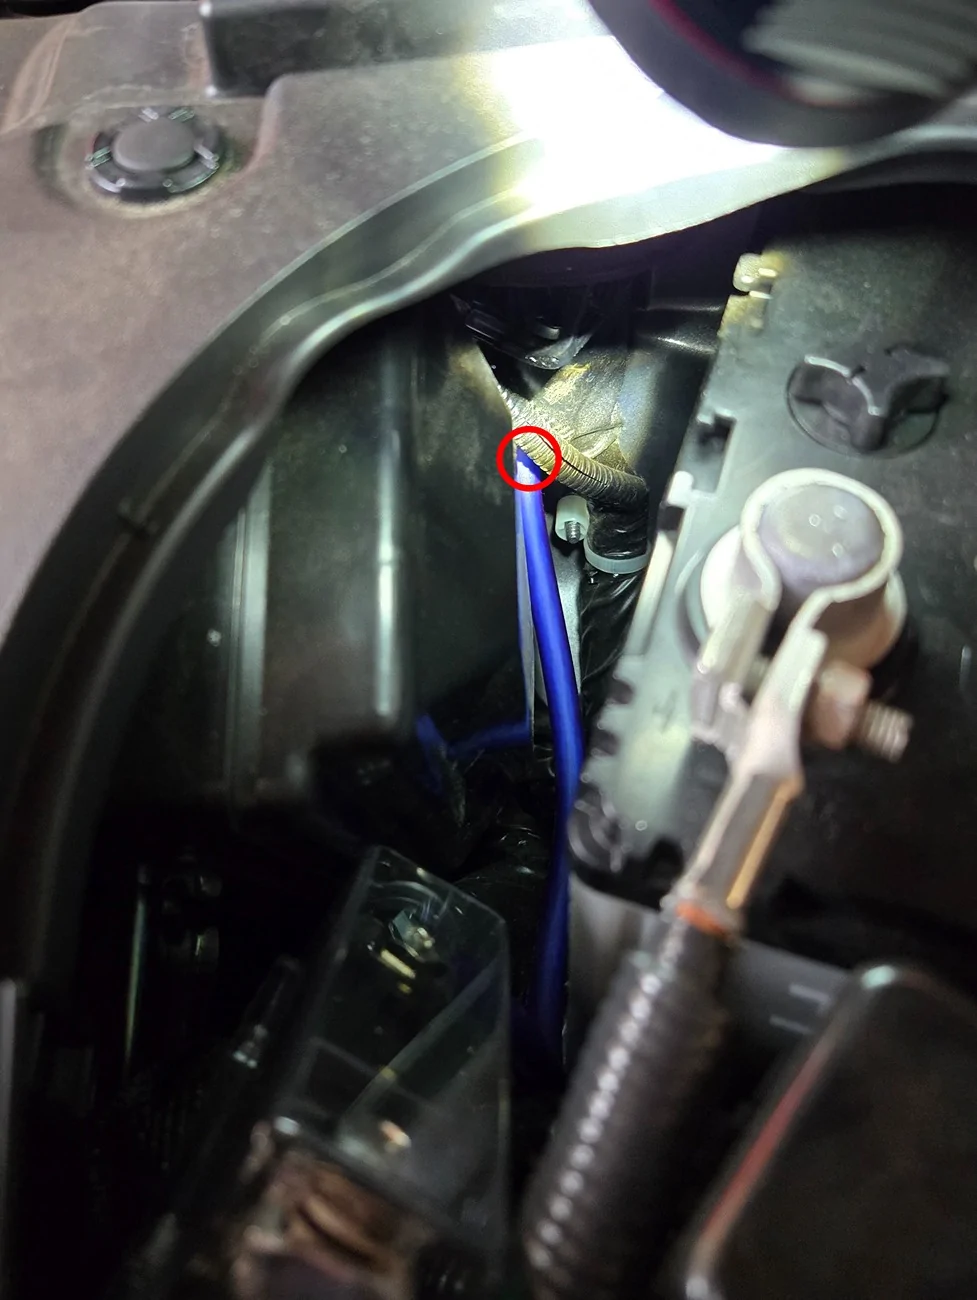
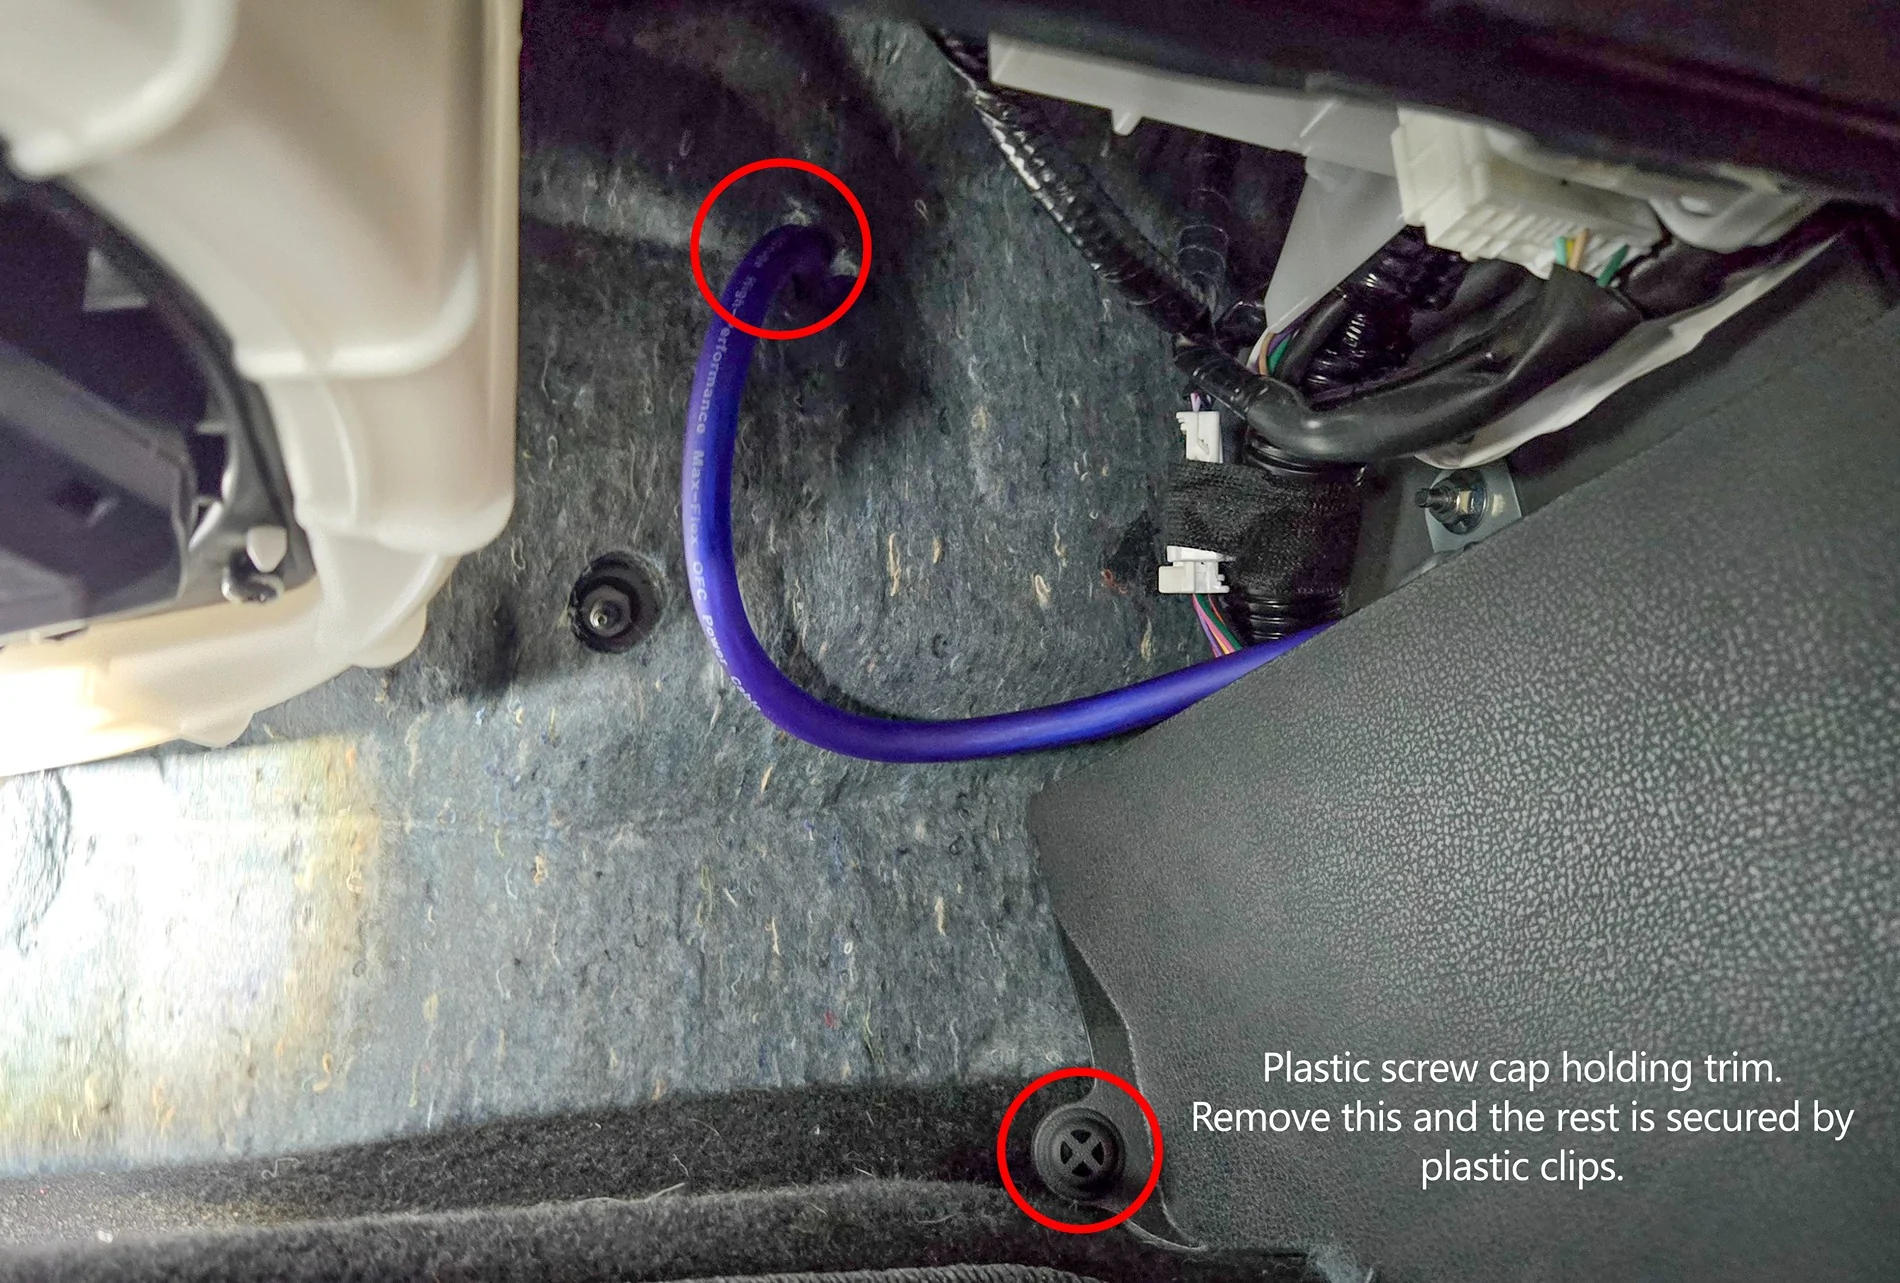
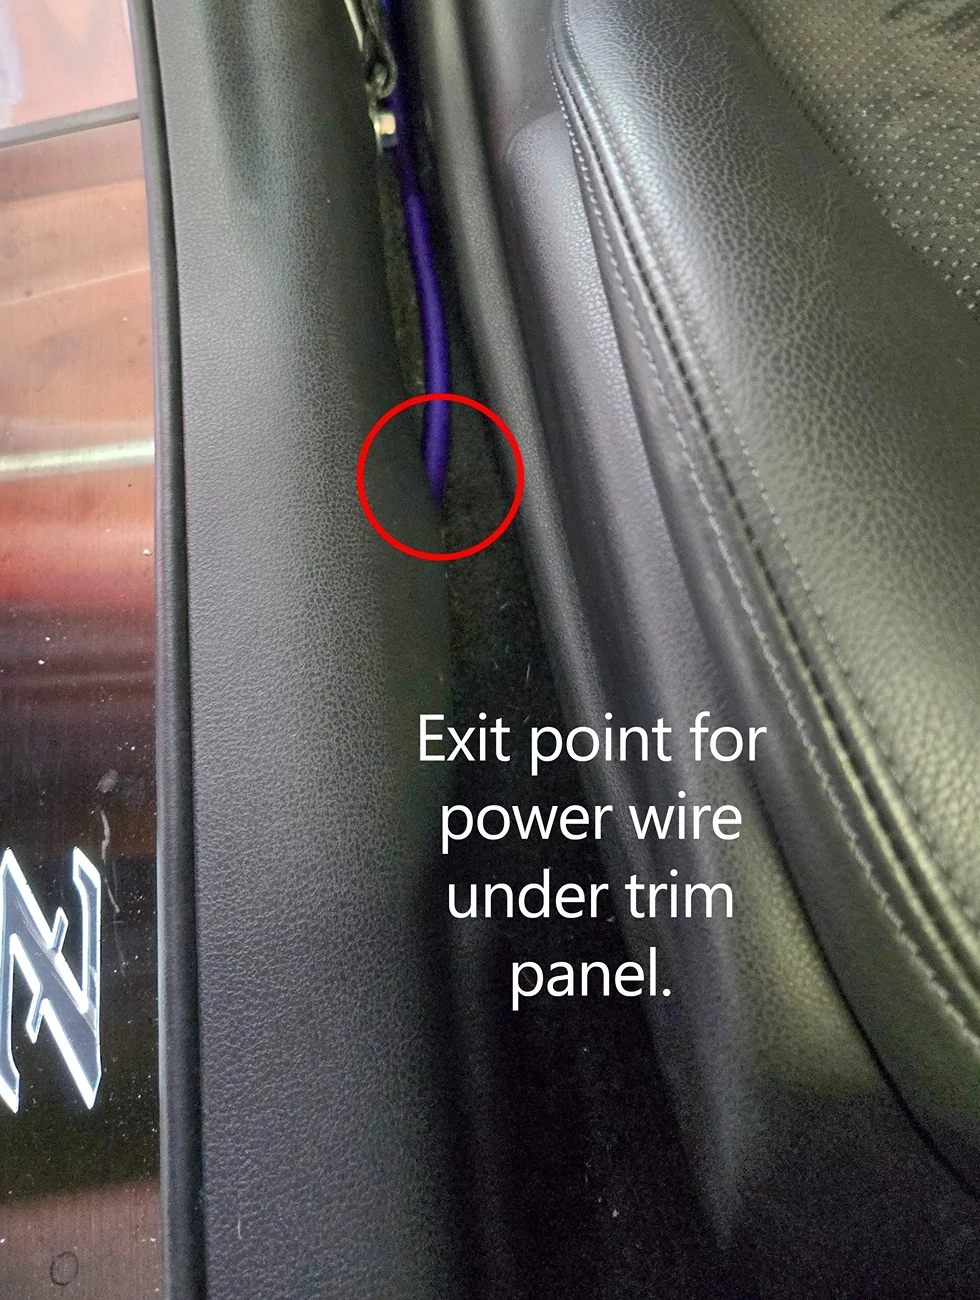
I found what I consider the perfect firewall entry point in another forum thread. It’s located just behind the battery and routes into the passenger-side footwell above the carpet. It’s difficult to photograph, but it’s ideal. So much so that the grommet from my wiring kit fit perfectly in the hole after removing the factory rubber plug. Once your power cable is in the cabin, pop the kick plate and side panel off and route your wire under it. There is one threaded plastic screw you’ll need to remove, and the rest of the panels are held on by clips… just pull up and away from the floor.


Grounding & Amplifier Placement
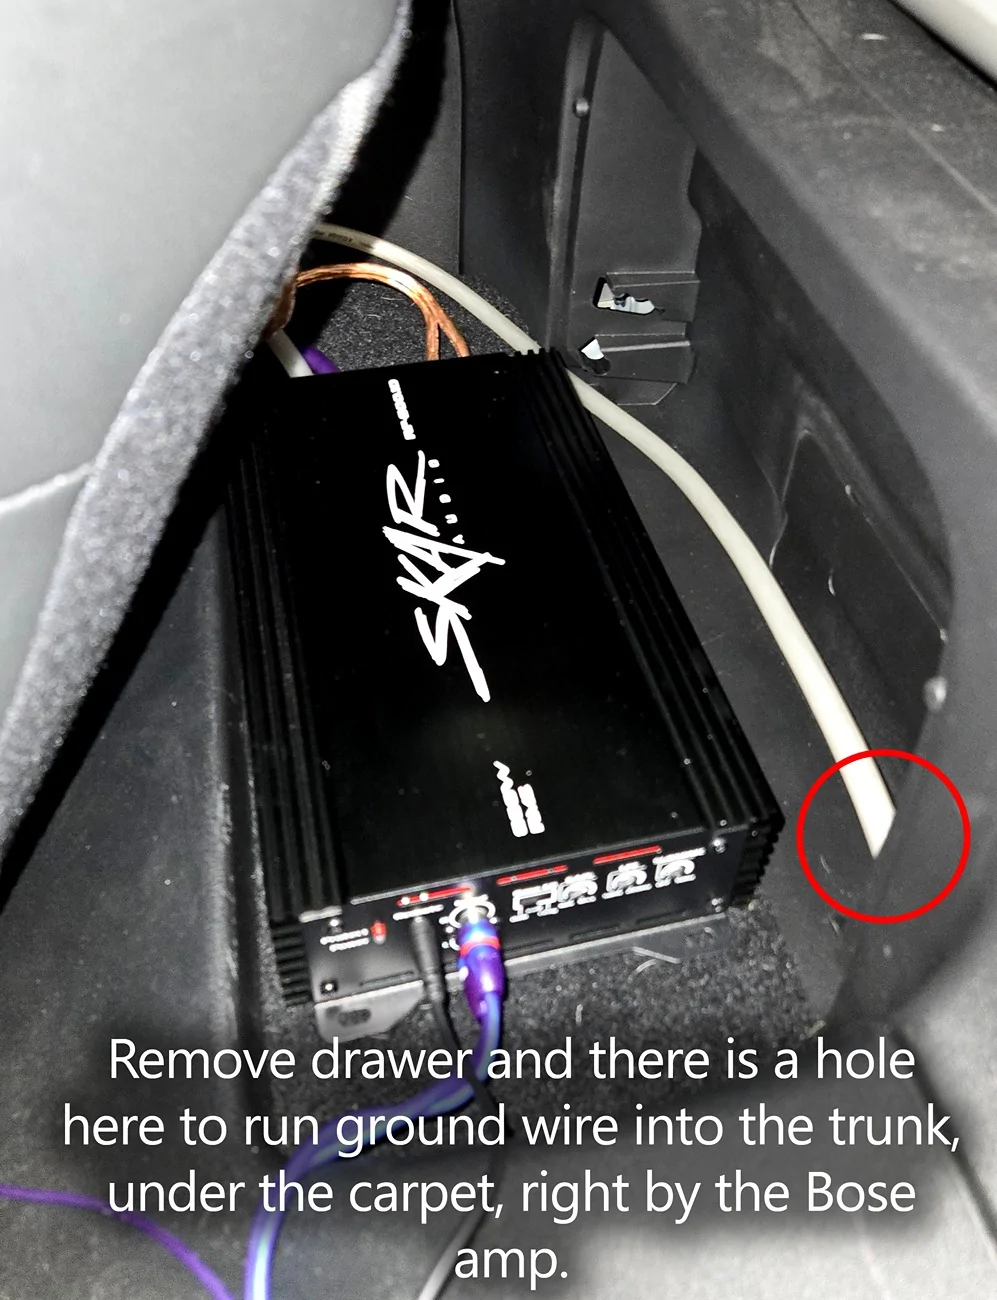
I positioned my amplifier on the shelf behind the passenger seat. Removing the fold-out drawer provided easy access to the trunk area under the carpet, where there are multiple grounding points.
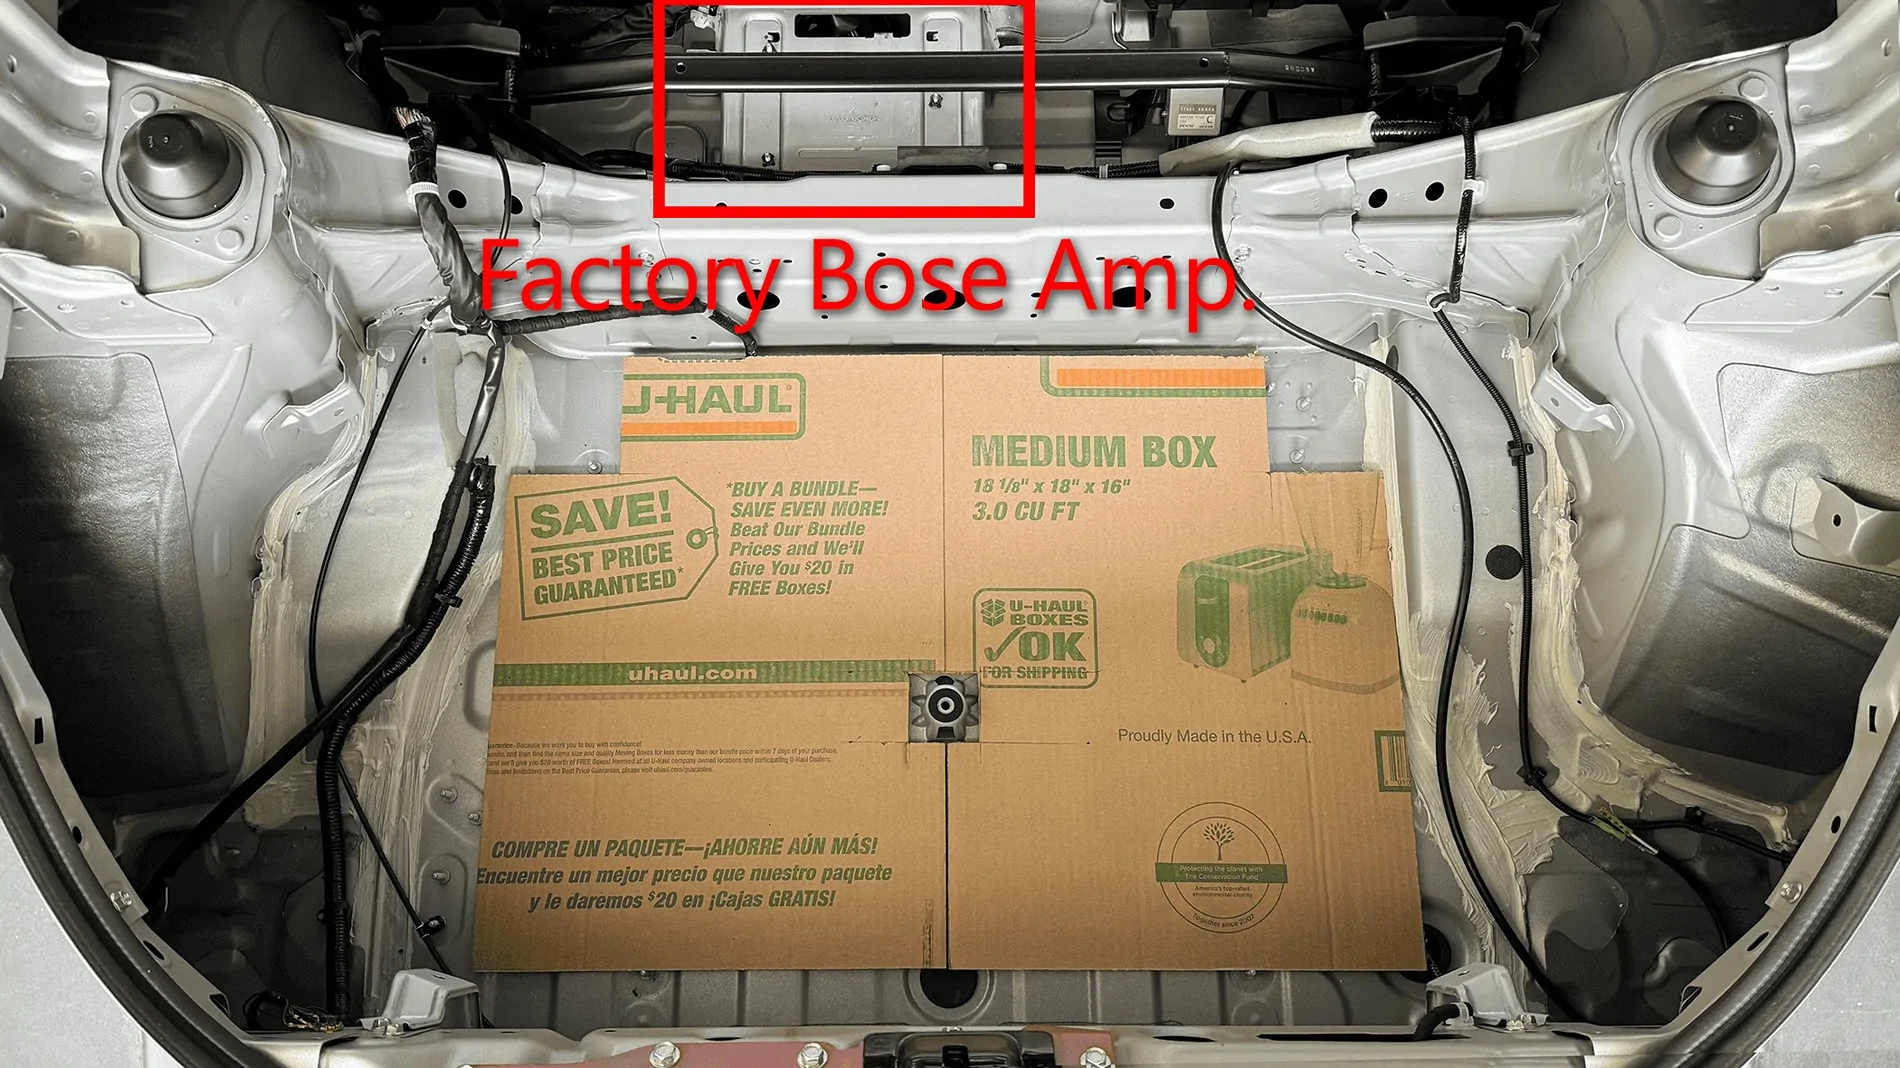
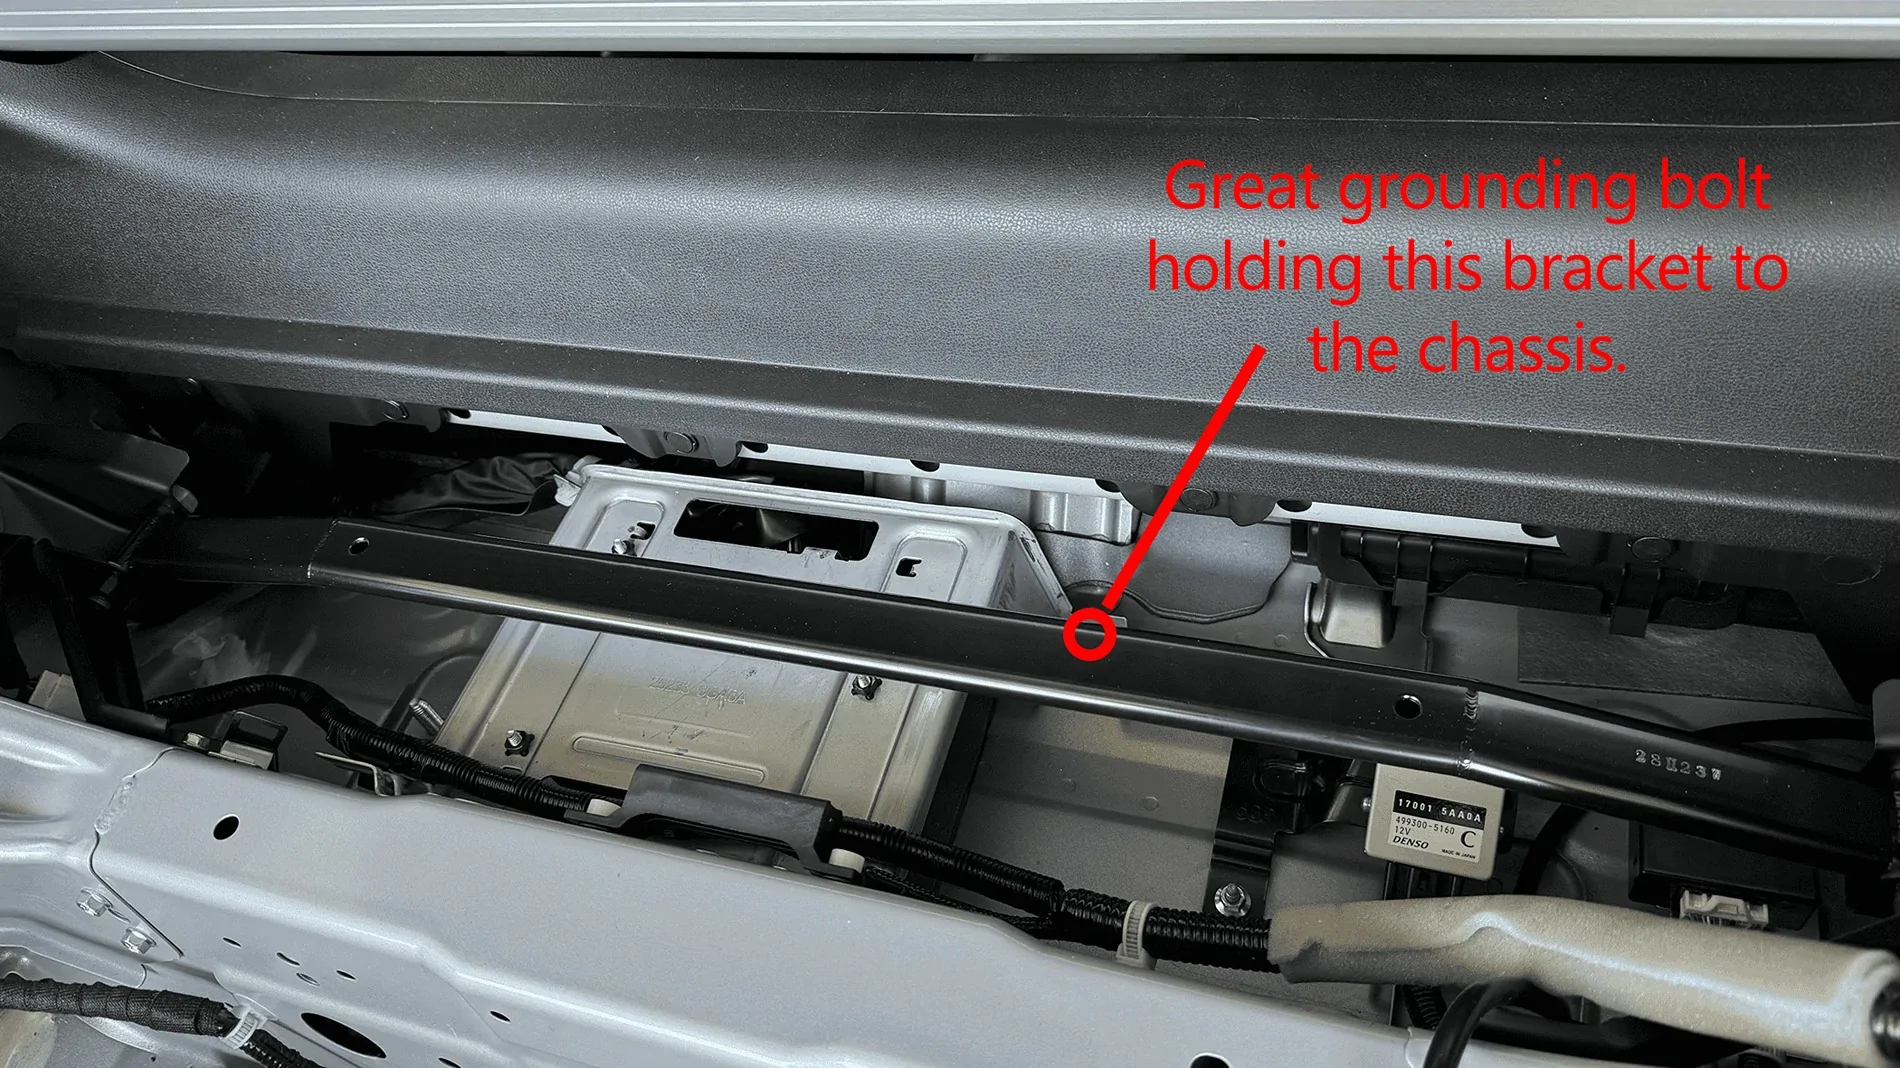
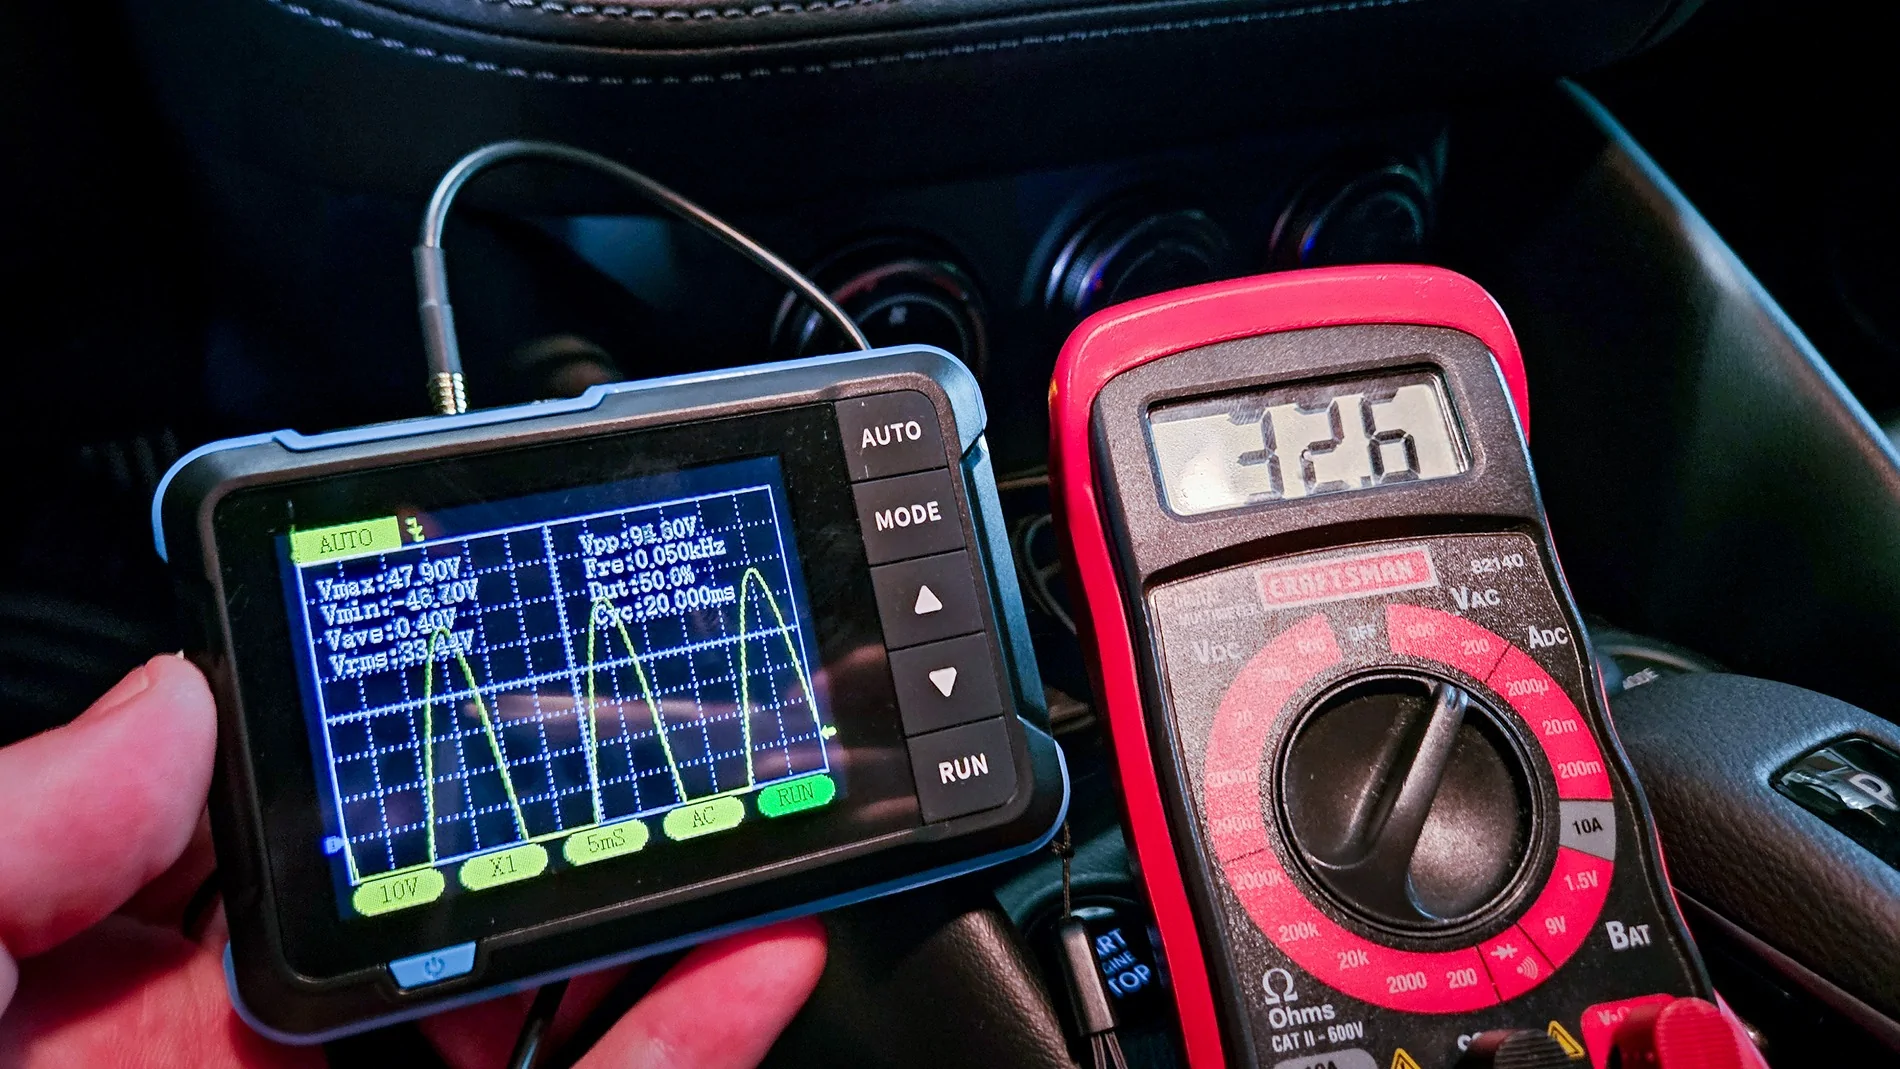
I chose a bolt securing the factory Bose amplifier bracket to the body, as a voltmeter confirmed a solid 0-ohm ground.

Disabling ANC (Active Noise Canceling)
Before finalizing the ground, I removed the amp to disable ANC.
From my research, Performance and NISMO trims with the Bose system have ANC enabled. One way to disable it is by unplugging the microphones used in the system. This breaks the circuit and turns ANC off.
Why this matters:
ANC will interpret your subwoofer’s low frequencies as “noise” and attempt to cancel them out by sending opposing sound waves through the speakers. This can cause:
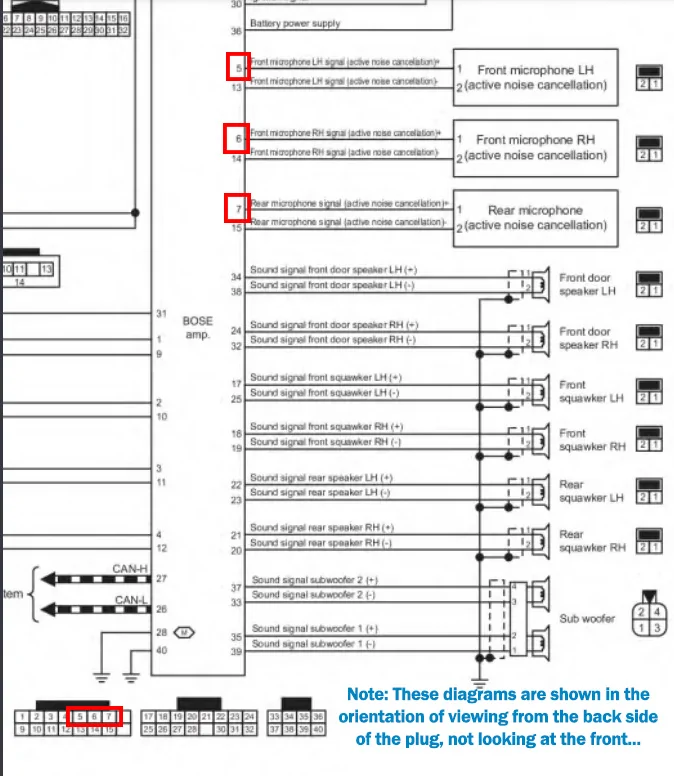
Wires 5,6,7 ( blue, yellow and violet) are the positive leads of the microphones. Remove them from the plug and tape them off with electrical tape. This process manually disables the microphones, disabling ANC.


The pin removal is a delicate process. Be patient. Here is a video that helped me understand the plug styles and functionality to learn how to remove the pins properly:
Automotive Connectors Pin Removal Guide | Learn to Remove any Terminal From any Connector
Other ANC Disable Options
You can also have a dealership disable ANC, but you may run into issues:
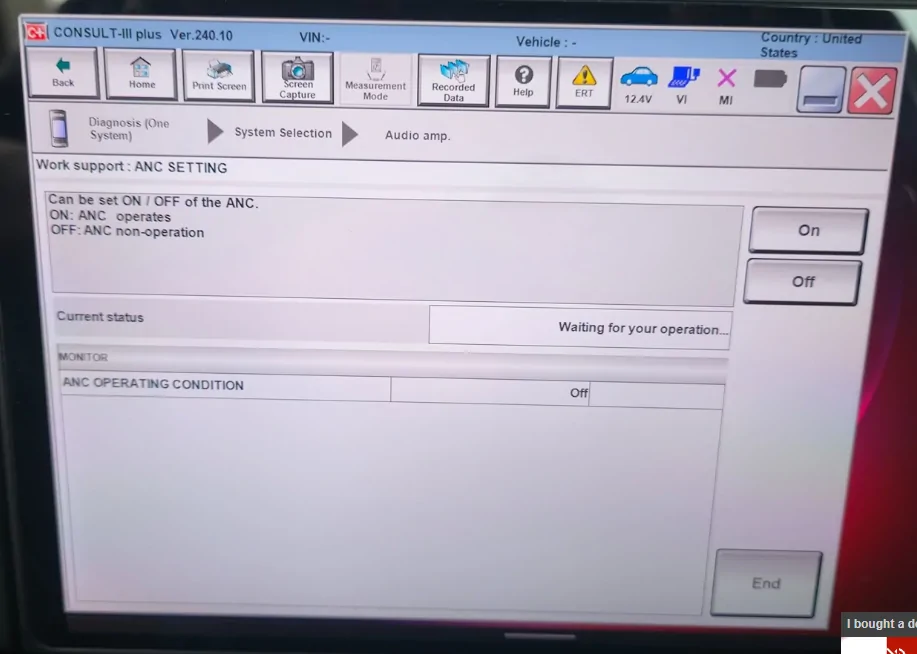
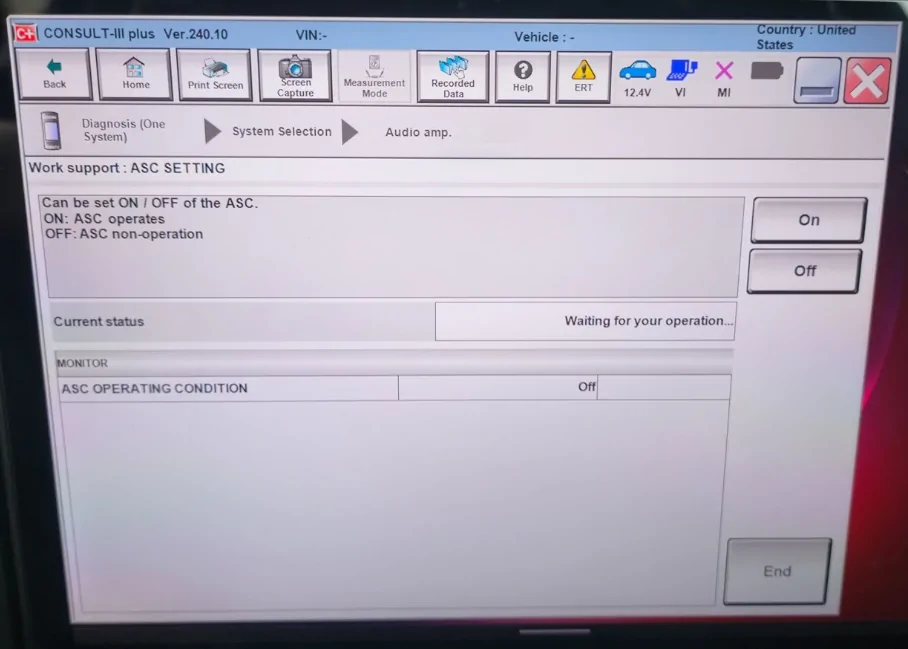
Dealerships can disable both ANC and ASE using their Consult III system. Take these screenshots with you and it may help them understand. These screenshots show where to go in the program to toggle off ANC and ASE/ASC.


Another option is to disable it yourself using an OBD connector and compatible software (see supporting forum threads for details).
Amplifier placement and cable routing are completely up to you—get creative and enjoy the process. I haven’t fully cleaned up my wiring yet because I wanted to test everything for a few weeks first.
From here, you’ll need to tune your system:
I used AI to help figure out the proper gain settings and ways to test for clipping. Amazon has a great cheap O-scope you can pick up: https://amzn.to/427G57D

Hope this helps!
Here are some resulting shenanigans:


Supporting threads:
Comparison of ANC/ASE on and off | 2023+ Nissan Z Forum, Community, Owners, News, Discussions (RZ34)
Since my dealer charged me 230$ to disable the ASE, I will do it myself | 2023+ Nissan Z Forum, Community, Owners, News, Discussions (RZ34)
Factory audio system questions. | 2023+ Nissan Z Forum, Community, Owners, News, Discussions (RZ34)
I wanted to share my experience and the path I took installing a subwoofer in my 2024 Z. There are a few other threads out there with pieces of this information—which were very helpful—but I couldn’t find a single place that walks you through the entire process from no sub to a fully installed system (annoying your neighbors included
).Disclaimer: I am NOT an audio expert by any means, and I don’t claim to know even 1% of what a professional installer does. I’m an IT guy who enjoys big bass and DIY’d my way to it. I’m very happy with the results and just want to share my experience so others can tackle this themselves if they choose.
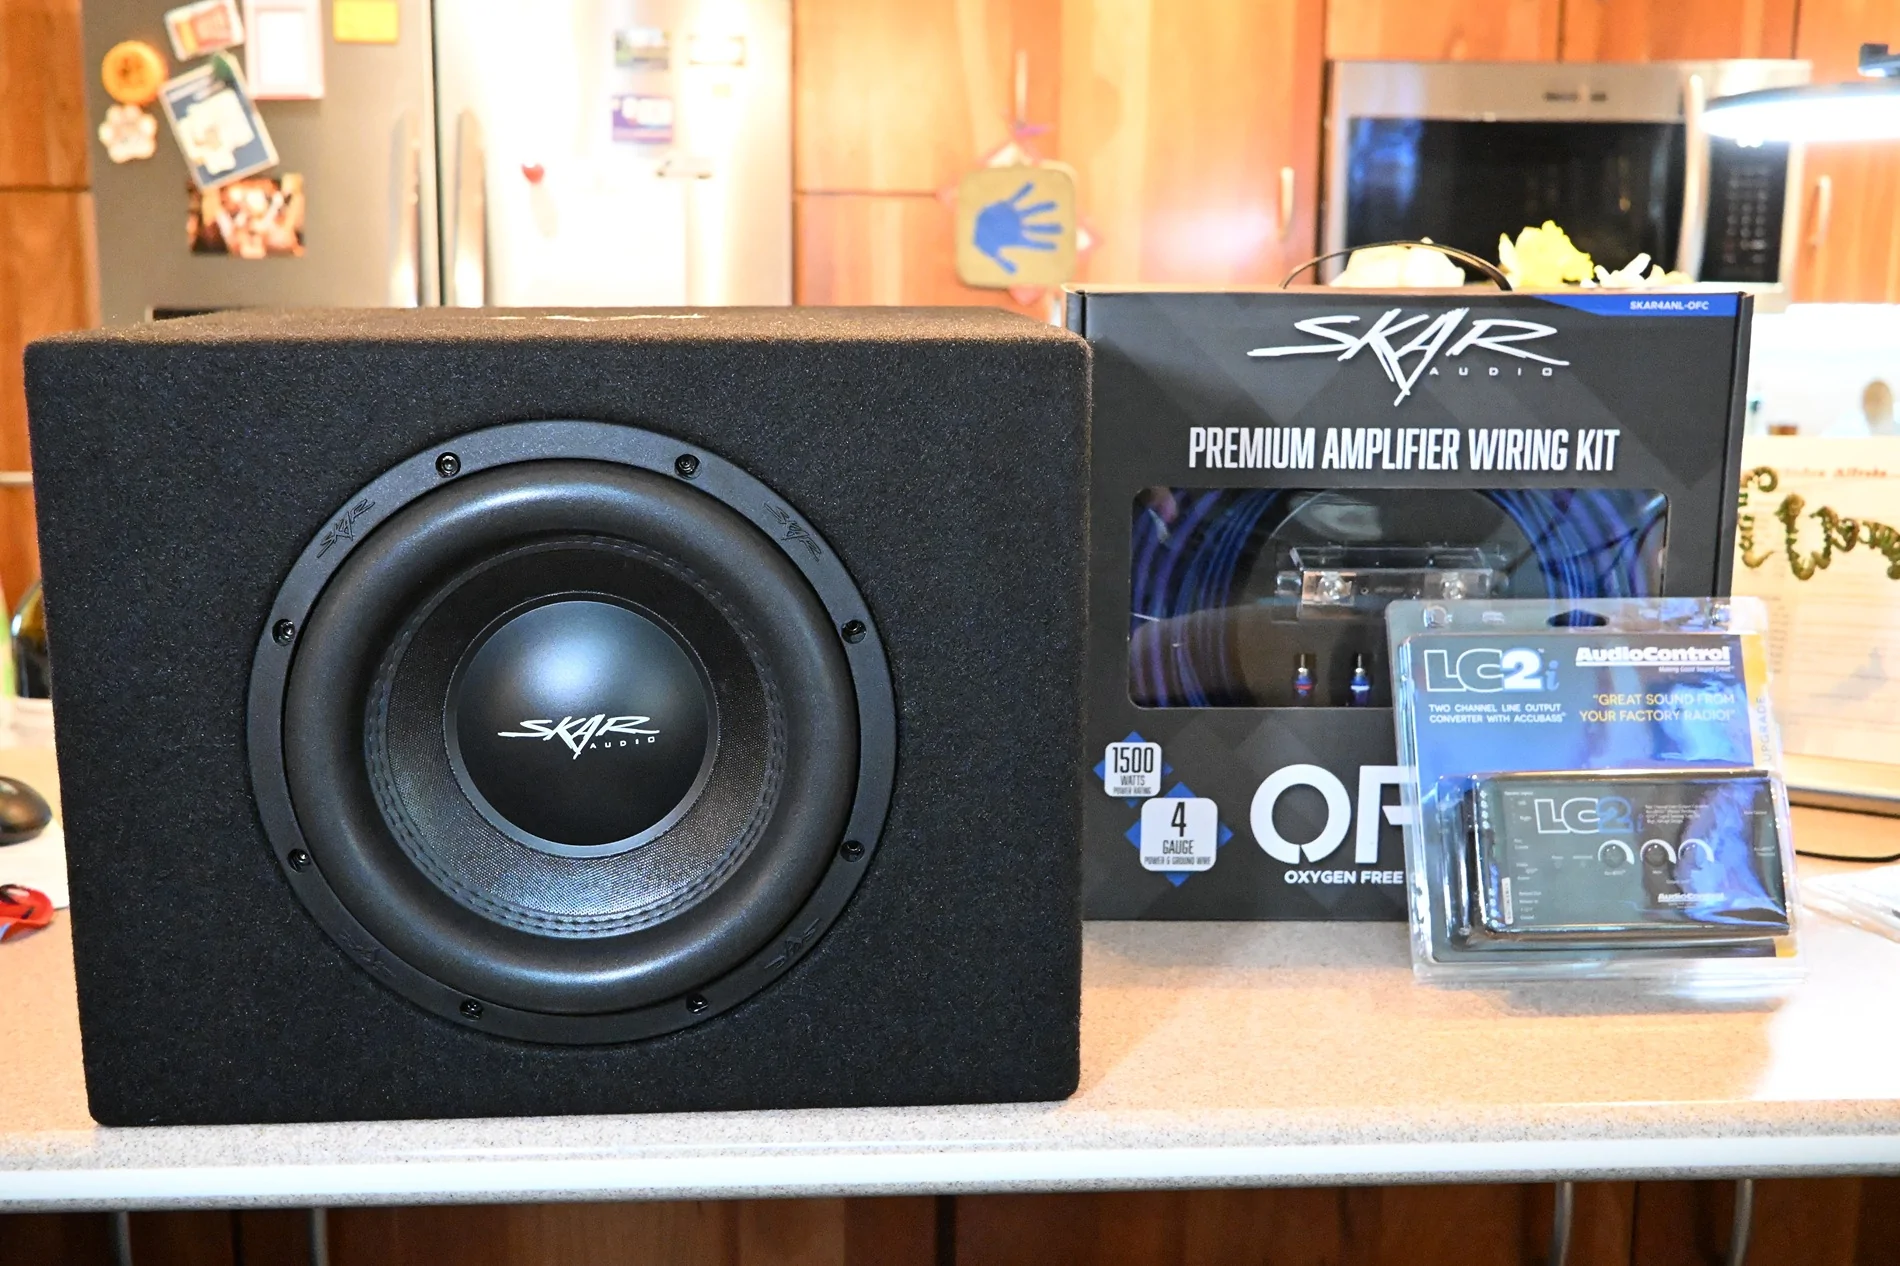
Parts List:
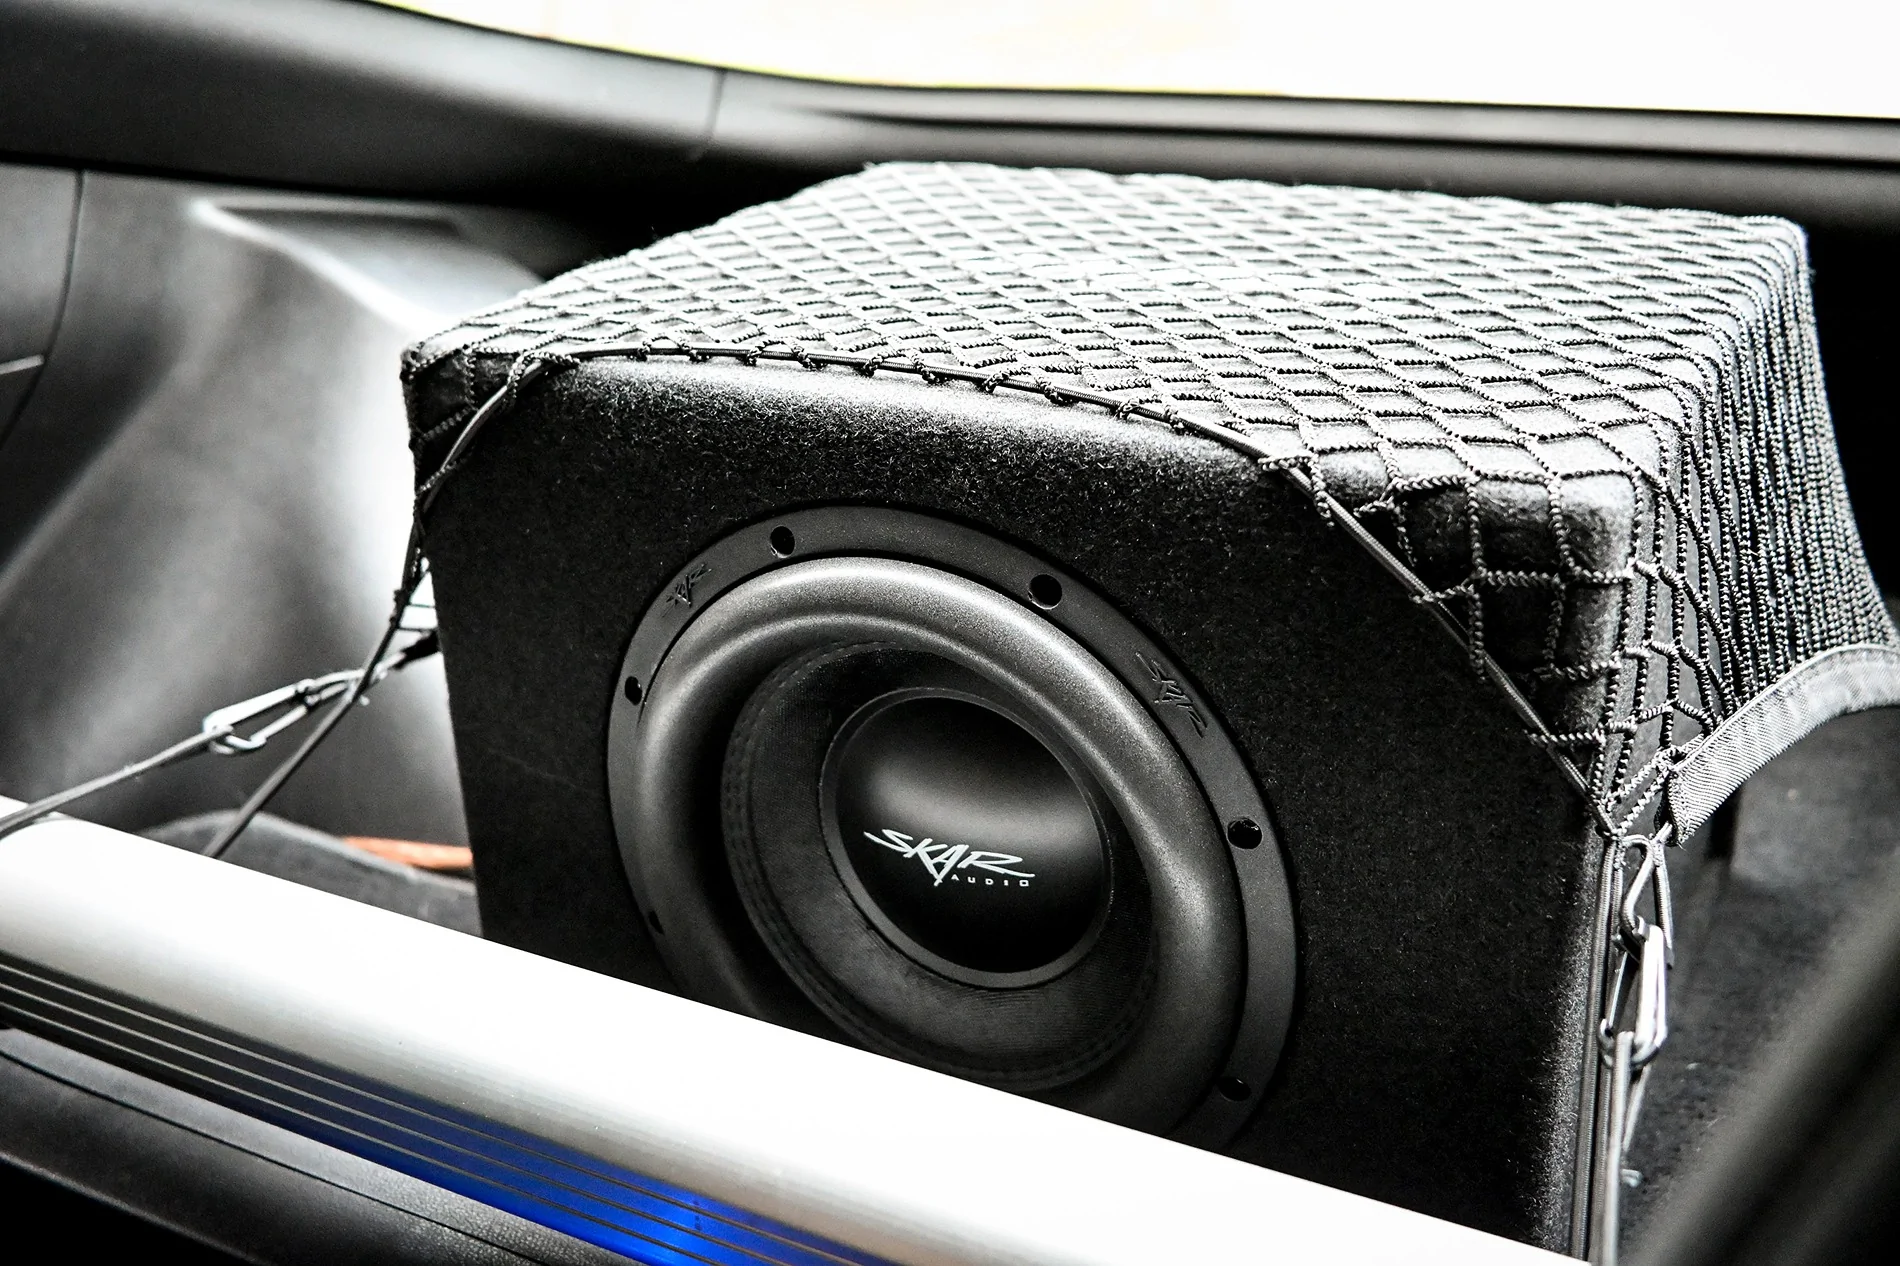
- Skar Audio Single 10" 1600W Loaded SVR Series
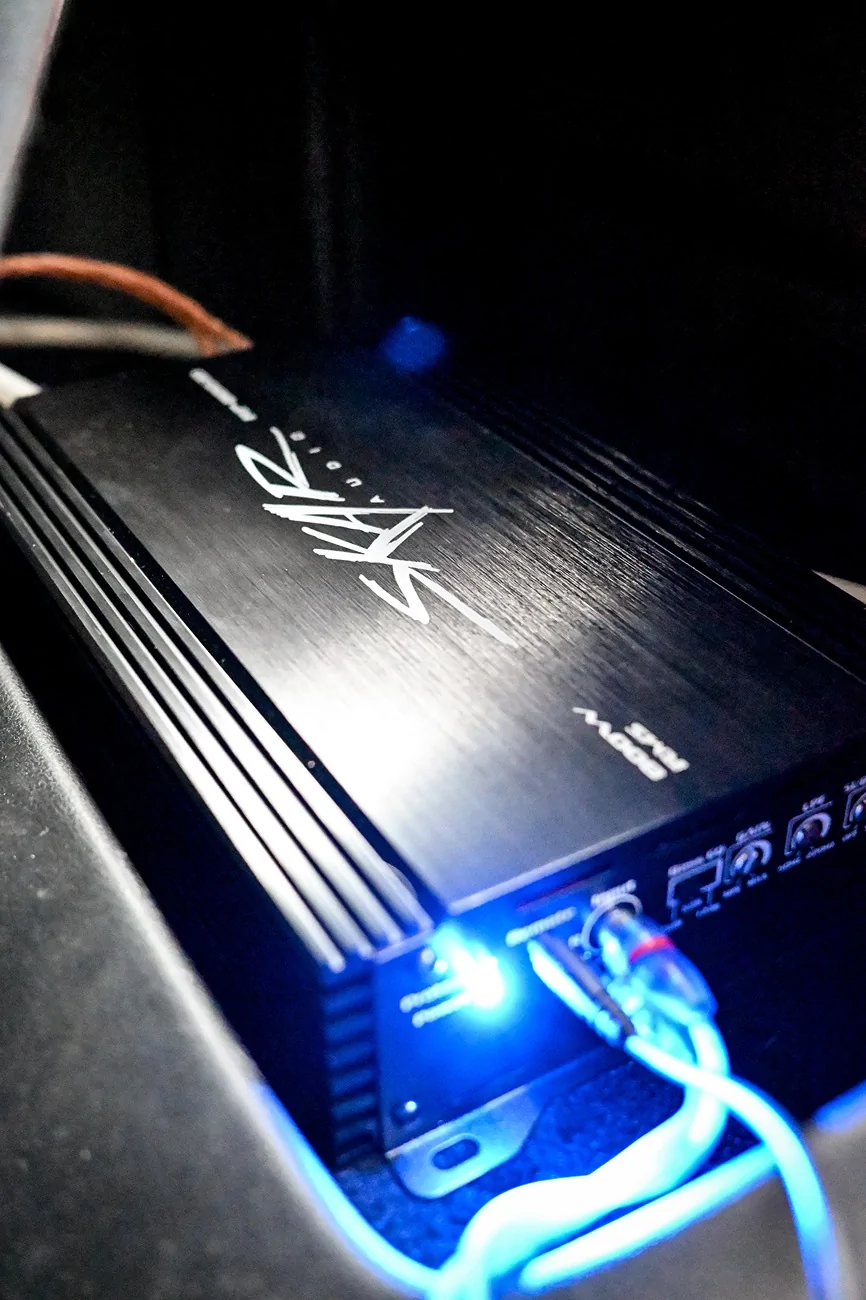
- Skar Audio RP-800.1D Monoblock Class D MOSFET Amplifier with Remote Subwoofer Level Control (800W)
- Skar Audio 4 Gauge OFC Complete Amplifier Installation Wiring Kit
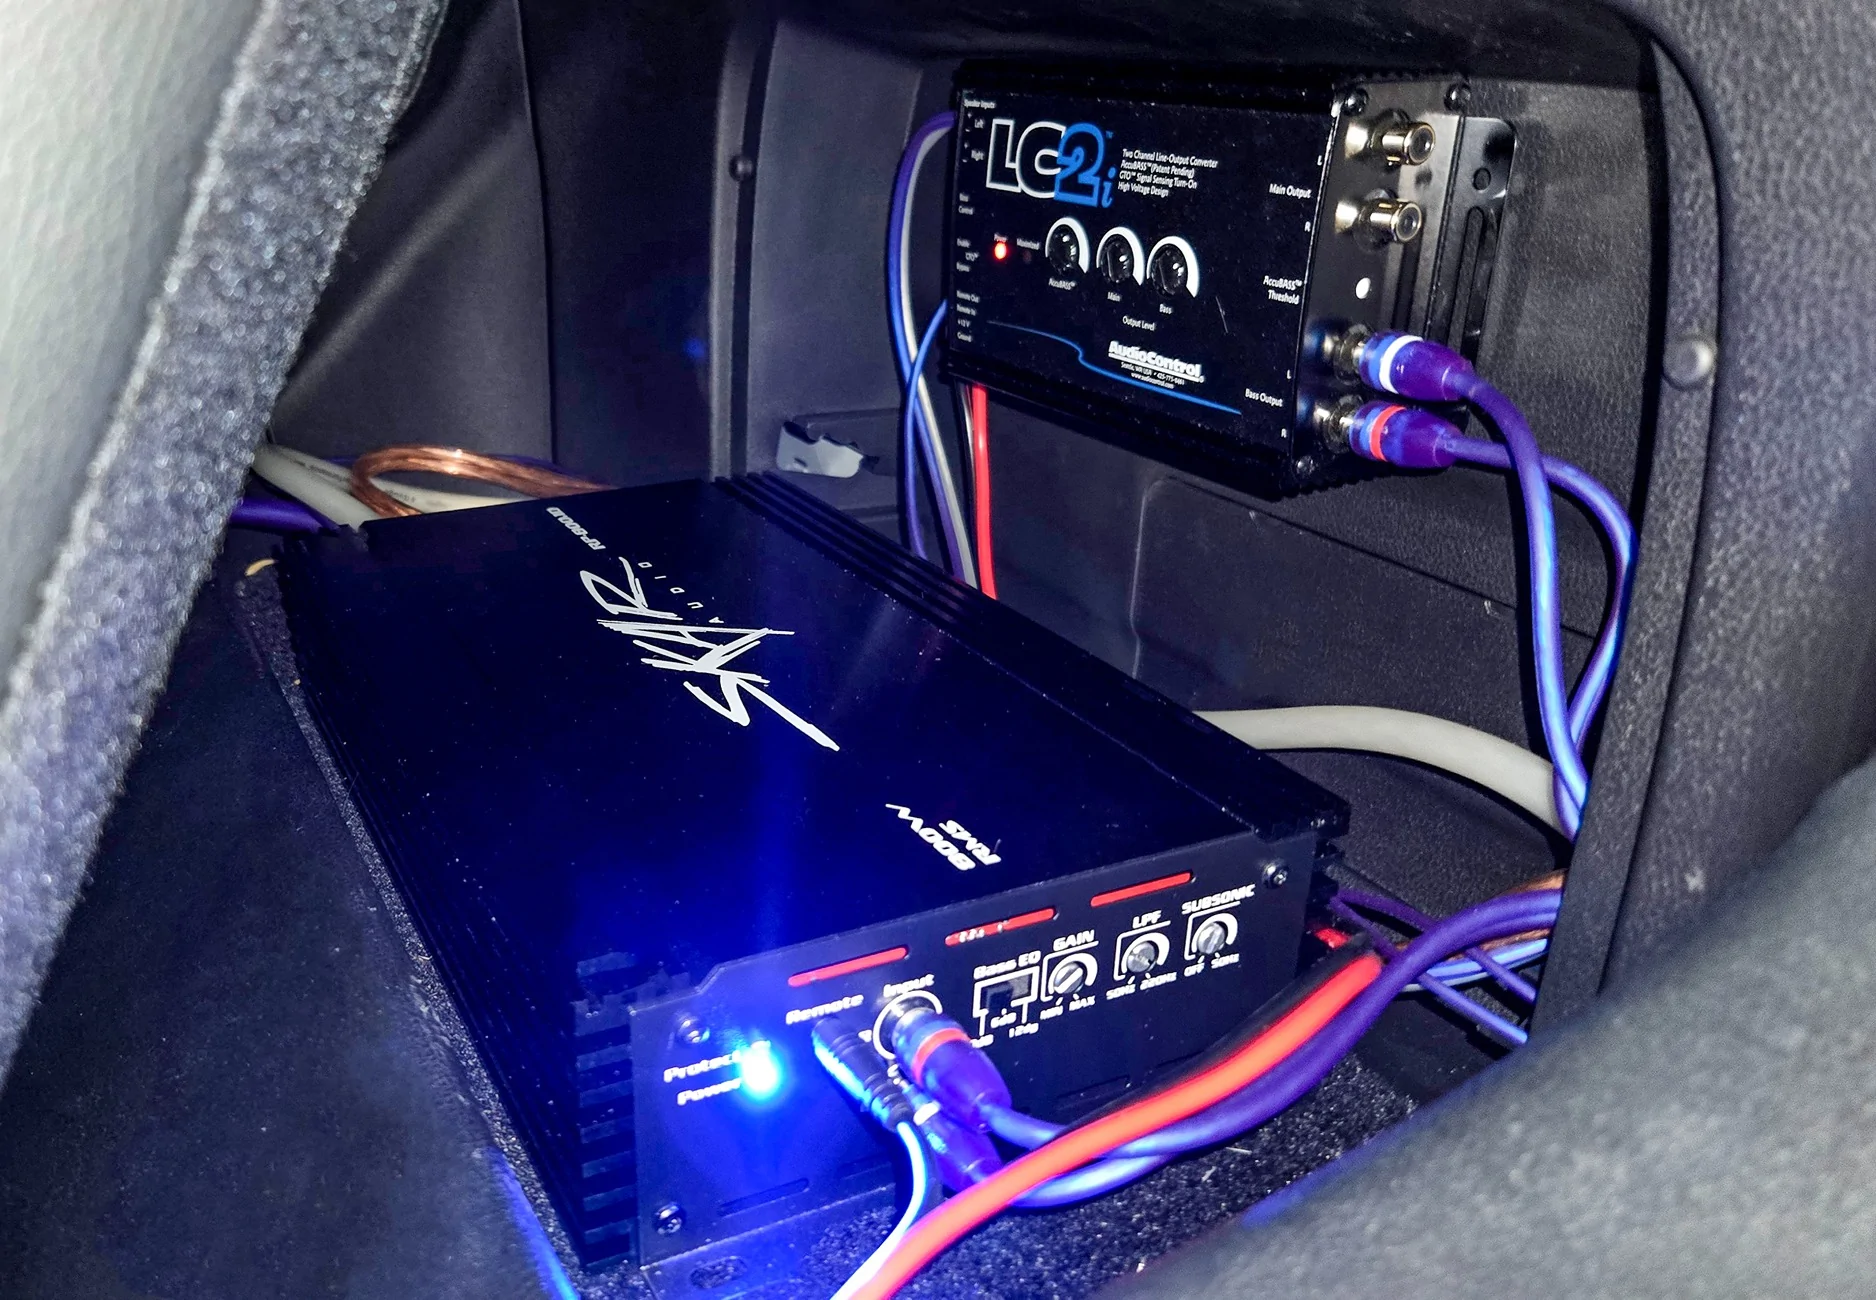
- AudioControl LC2i 2-Channel Line Output Converter with AccuBASS
- Posi-Tap connectors (12–18 gauge, pack of 6)
- 12V Cigarette Lighter Plug with On/Off Switch (6 ft, 16AWG, 15A fused)
As my parts arrived, I installed them while continuing to research along the way.Line Output Converter (LOC)
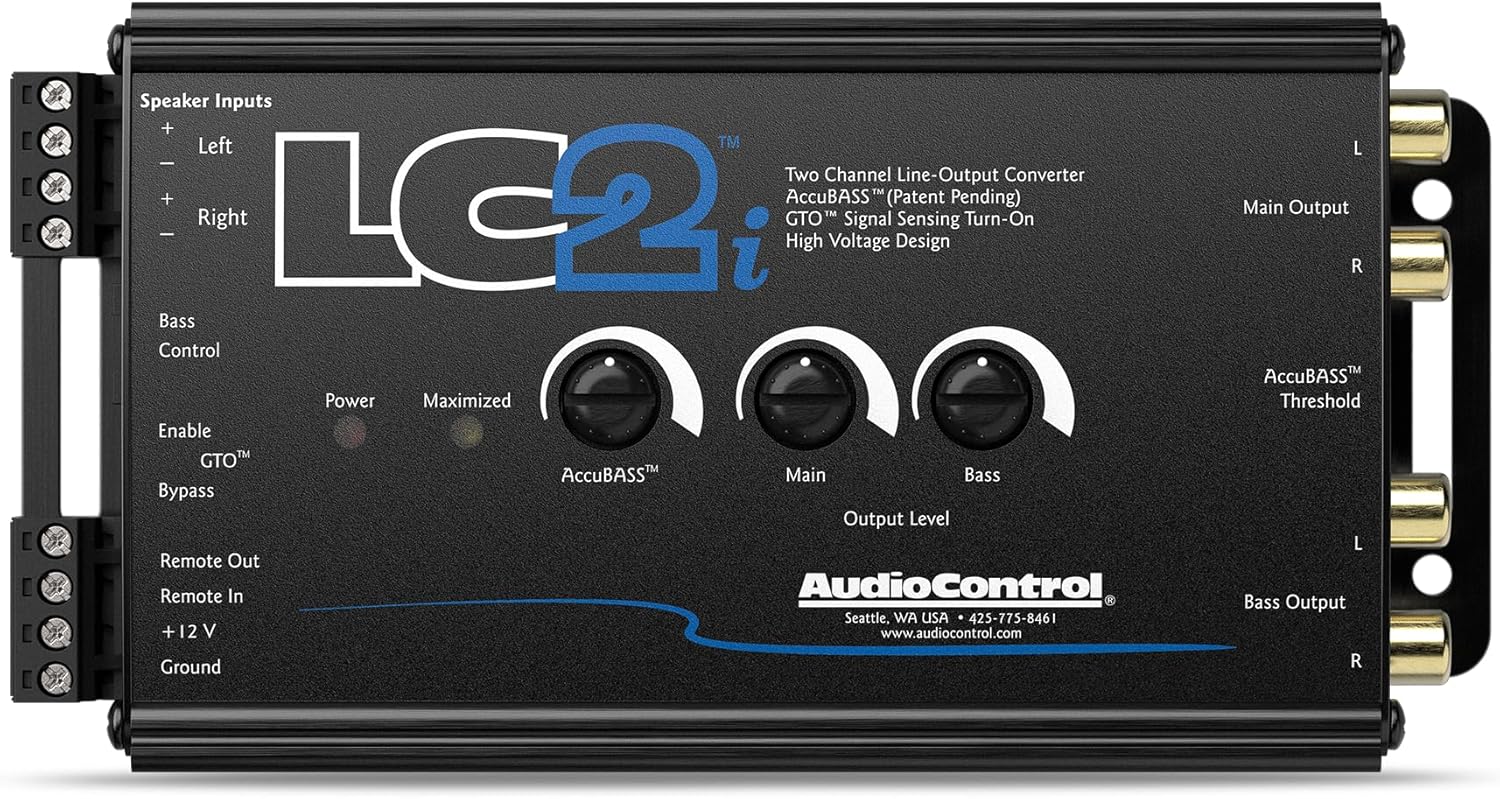
I started with the LOC. First, I tapped into the factory Bose speaker input (this signal is modified by the factory amp). If you want a cleaner, unmodified signal, you can tap into the speaker wires directly from the head unit before they reach the Bose amp. That said, I’m happy with my current sound and don’t plan to change it.
I used Posi-Tap connectors to tap into the wires. Looking at the plug connecting to the factory installed Bose spare tire sub, the top two wires are positive, and the bottom two are negative. I initially tapped all four wires before realizing that only one set is needed for my LOC.
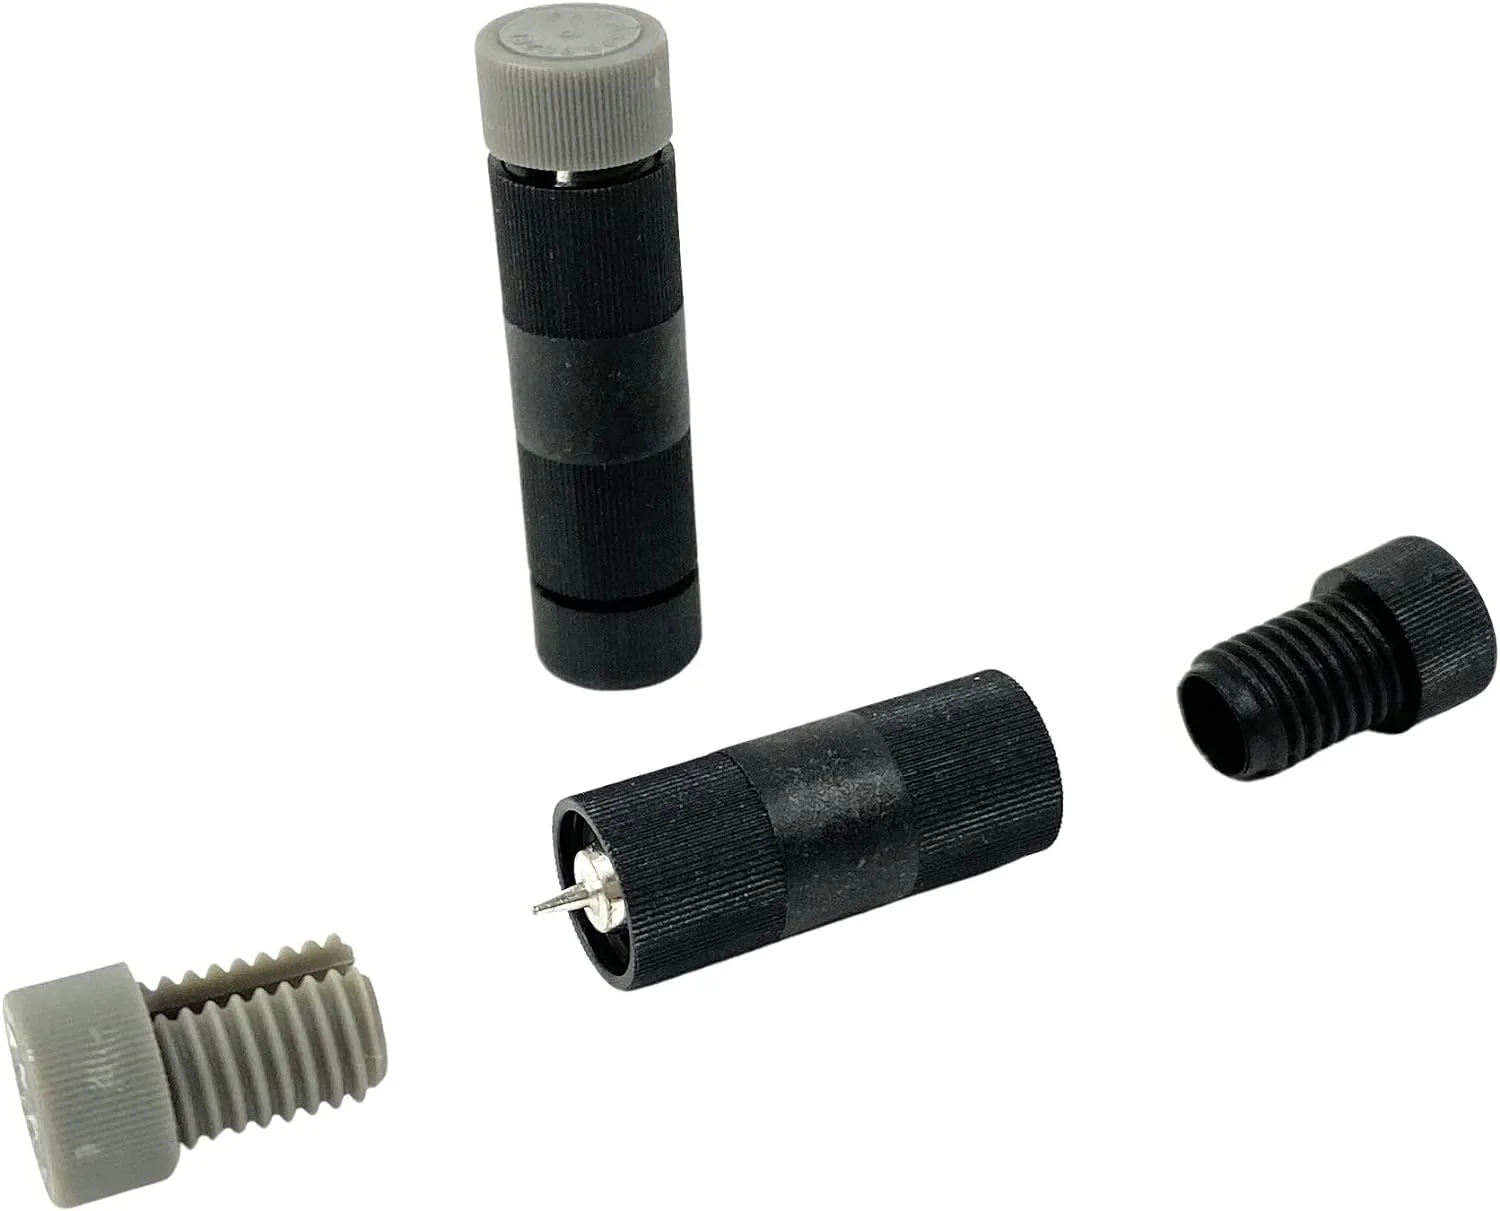
Note: These are NOT T-tap connectors. While T-taps may work for some, they’re not recommended due to potential connectivity issues.
After making the connections, I ran the extended speaker wires to the LOC.
If you don’t want to tap the connections, you can buy a wiring harness adapter from OWC Upgrades: Z (2023-2025): Audio Interface Harness Adapters, PLATINUM SERIES | OWC Upgrades
For power, I used a 12V cigarette lighter fused adapter. There are several ways to power your LOC:
- Use signal sensing (some LOCs can turn on automatically when audio is detected.) Allowing you to tap into the amplifier’s power and ground.
- Use an “Add-a-Circuit” fuse tap (research required) https://amzn.to/4suIfdi
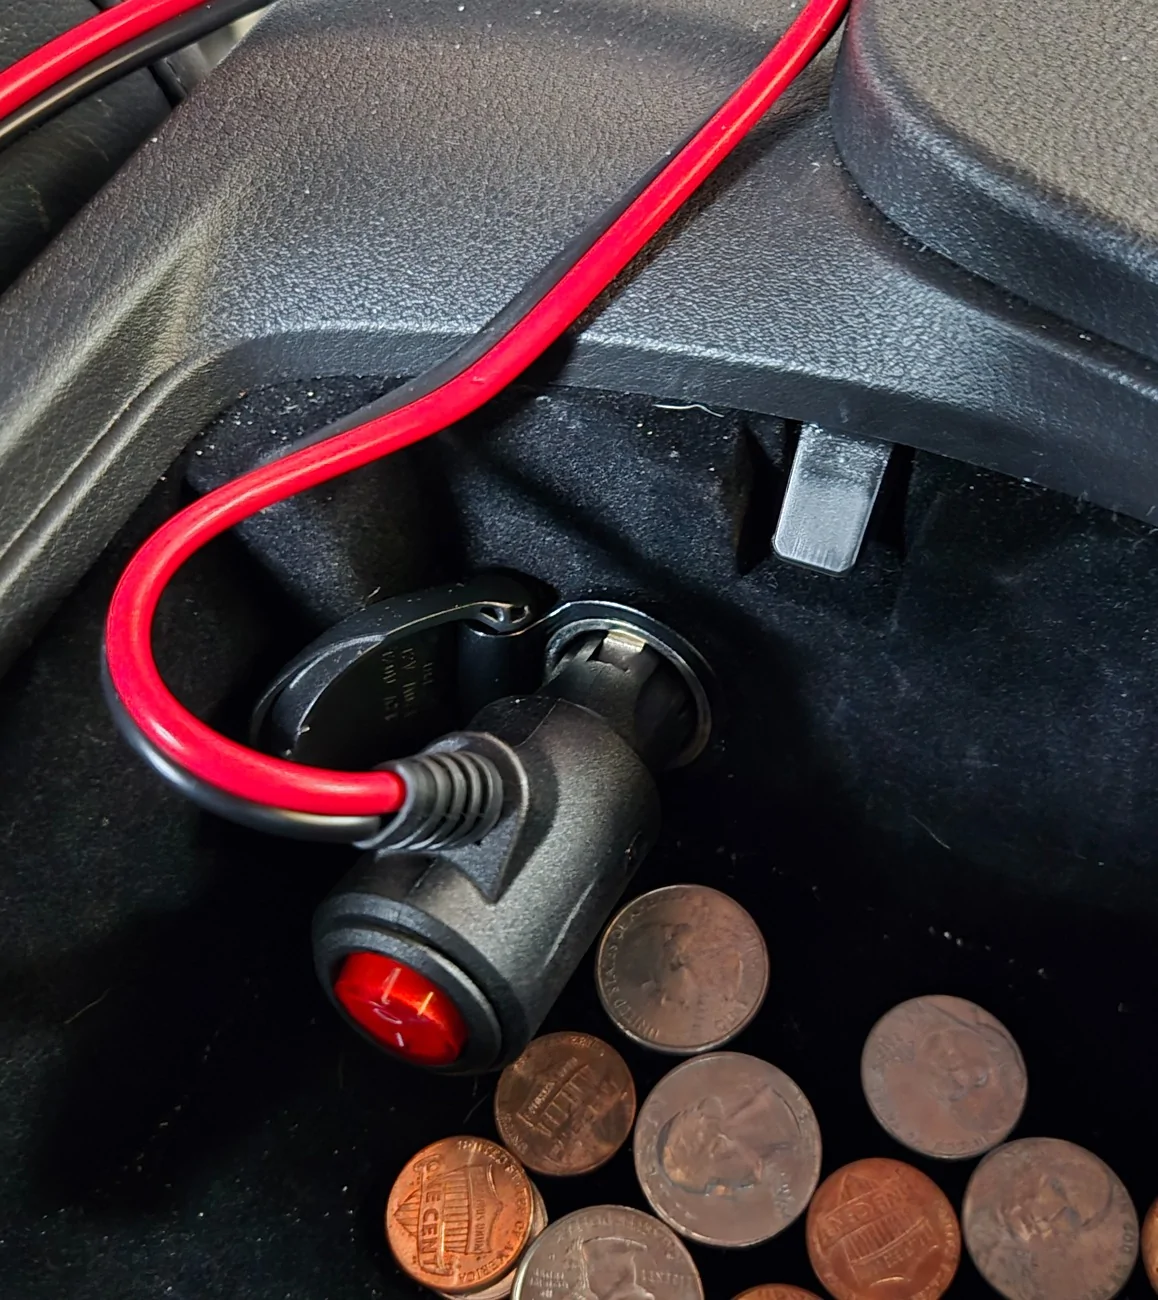
Power Wire & Firewall EntryNext, I ran the 4-gauge power wire and ground.
I found what I consider the perfect firewall entry point in another forum thread. It’s located just behind the battery and routes into the passenger-side footwell above the carpet. It’s difficult to photograph, but it’s ideal. So much so that the grommet from my wiring kit fit perfectly in the hole after removing the factory rubber plug. Once your power cable is in the cabin, pop the kick plate and side panel off and route your wire under it. There is one threaded plastic screw you’ll need to remove, and the rest of the panels are held on by clips… just pull up and away from the floor.
Grounding & Amplifier Placement
I positioned my amplifier on the shelf behind the passenger seat. Removing the fold-out drawer provided easy access to the trunk area under the carpet, where there are multiple grounding points.
I chose a bolt securing the factory Bose amplifier bracket to the body, as a voltmeter confirmed a solid 0-ohm ground.
Disabling ANC (Active Noise Canceling)
Before finalizing the ground, I removed the amp to disable ANC.
From my research, Performance and NISMO trims with the Bose system have ANC enabled. One way to disable it is by unplugging the microphones used in the system. This breaks the circuit and turns ANC off.
Why this matters:
ANC will interpret your subwoofer’s low frequencies as “noise” and attempt to cancel them out by sending opposing sound waves through the speakers. This can cause:
- Buzzing
- Pulsing bass
- Reduced overall bass output
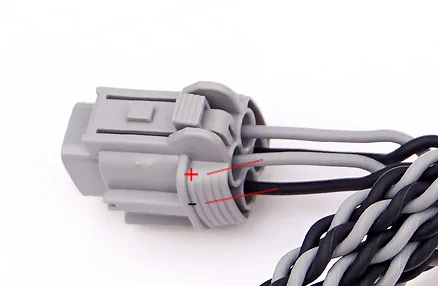
Unbolt the amplifier bracket from the body. Wiggle it out enough that you can reach the plug closest to the driver’s side. This is the plug that contains the wires for the ANC microphones. Remove the plug from the amplifier to access the wires for removal.
Wires 5,6,7 ( blue, yellow and violet) are the positive leads of the microphones. Remove them from the plug and tape them off with electrical tape. This process manually disables the microphones, disabling ANC.
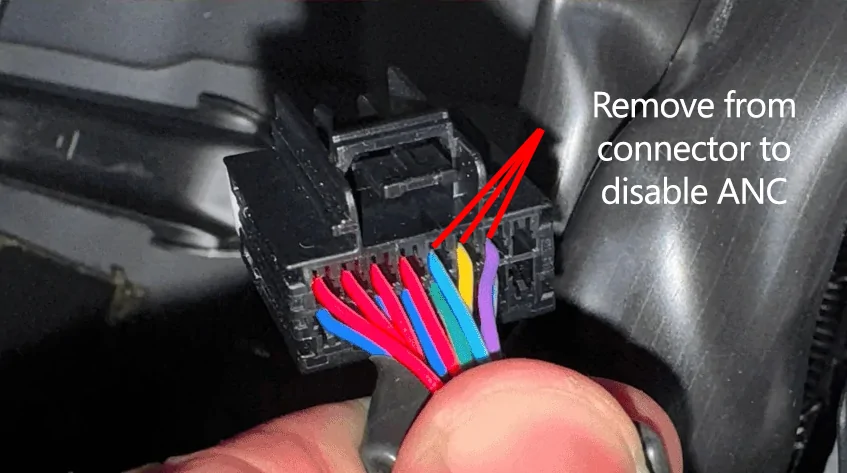
The pin removal is a delicate process. Be patient. Here is a video that helped me understand the plug styles and functionality to learn how to remove the pins properly:
Automotive Connectors Pin Removal Guide | Learn to Remove any Terminal From any Connector
You can also have a dealership disable ANC, but you may run into issues:
- They may not know what you’re referring to
- They may claim it voids your warranty (it does NOT—ANC is not a safety feature)
- They may charge you (some have reported $250+)
Dealerships can disable both ANC and ASE using their Consult III system. Take these screenshots with you and it may help them understand. These screenshots show where to go in the program to toggle off ANC and ASE/ASC.

Another option is to disable it yourself using an OBD connector and compatible software (see supporting forum threads for details).
Final NotesAmplifier placement and cable routing are completely up to you—get creative and enjoy the process. I haven’t fully cleaned up my wiring yet because I wanted to test everything for a few weeks first.
That’s It!From here, you’ll need to tune your system:
- Gain
- Low-pass filter
- Subsonic filter
- Etc.
I used AI to help figure out the proper gain settings and ways to test for clipping. Amazon has a great cheap O-scope you can pick up: https://amzn.to/427G57D
Hope this helps!
Here are some resulting shenanigans:

Supporting threads:
Comparison of ANC/ASE on and off | 2023+ Nissan Z Forum, Community, Owners, News, Discussions (RZ34)
Since my dealer charged me 230$ to disable the ASE, I will do it myself | 2023+ Nissan Z Forum, Community, Owners, News, Discussions (RZ34)
Factory audio system questions. | 2023+ Nissan Z Forum, Community, Owners, News, Discussions (RZ34)
Last edited:

")

