Sponsored

Some issues installing eibach springs

KelvinllMelvin

Active Member
First Name
kelvin
Joined
Dec 5, 2025
Threads
13
Messages
30
Reaction score
27
Location
NY
Car(s)
Nissan z
Finally got the mounting nut off from the shock absorbers and installed my eibach springs, the front springs are on right now but I want to know what I did wrong because oh boy installing just the fronts took all day literally.

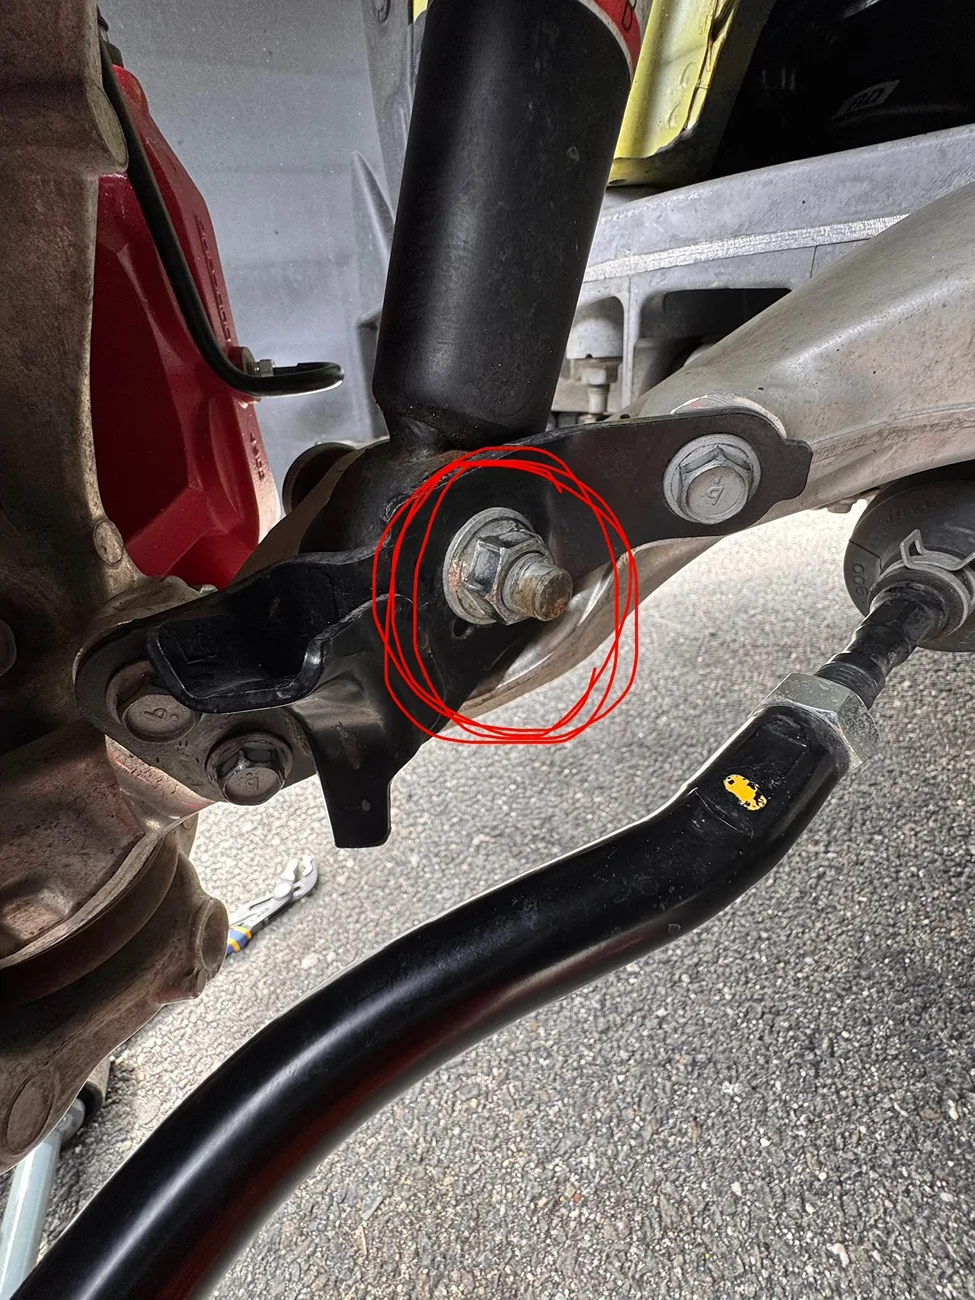
Took the stock “coilovers” no problem, pb blaster came in clutch. But as I removed the stock spring and on the eibach springs, mounting the strut back on to the car was SUCH a hassle. I couldn’t get the bottom mounting bolt/nut aligned together. Upon careful inspection the hole on the shock absorber where the bolt goes thru and tightened by the nut (I’ll have a pic circled for reference) was a bit angled off. Raising the lower control arm was no use and it was angled horizontally. I tried twisting the shocks hoping a little budge would align it, no use.

I had to take it out again, compress the springs, loosen the top nut where it holds the springs, and rotate the top rubber hat so the bottom mounting bolt can align to the lower control arm. Basically this procedure rinse and repeat until it finally aligned and bolt was able to go in. On YouTube I’ve just seen guys just swapping out springs and mount it back on no problem.

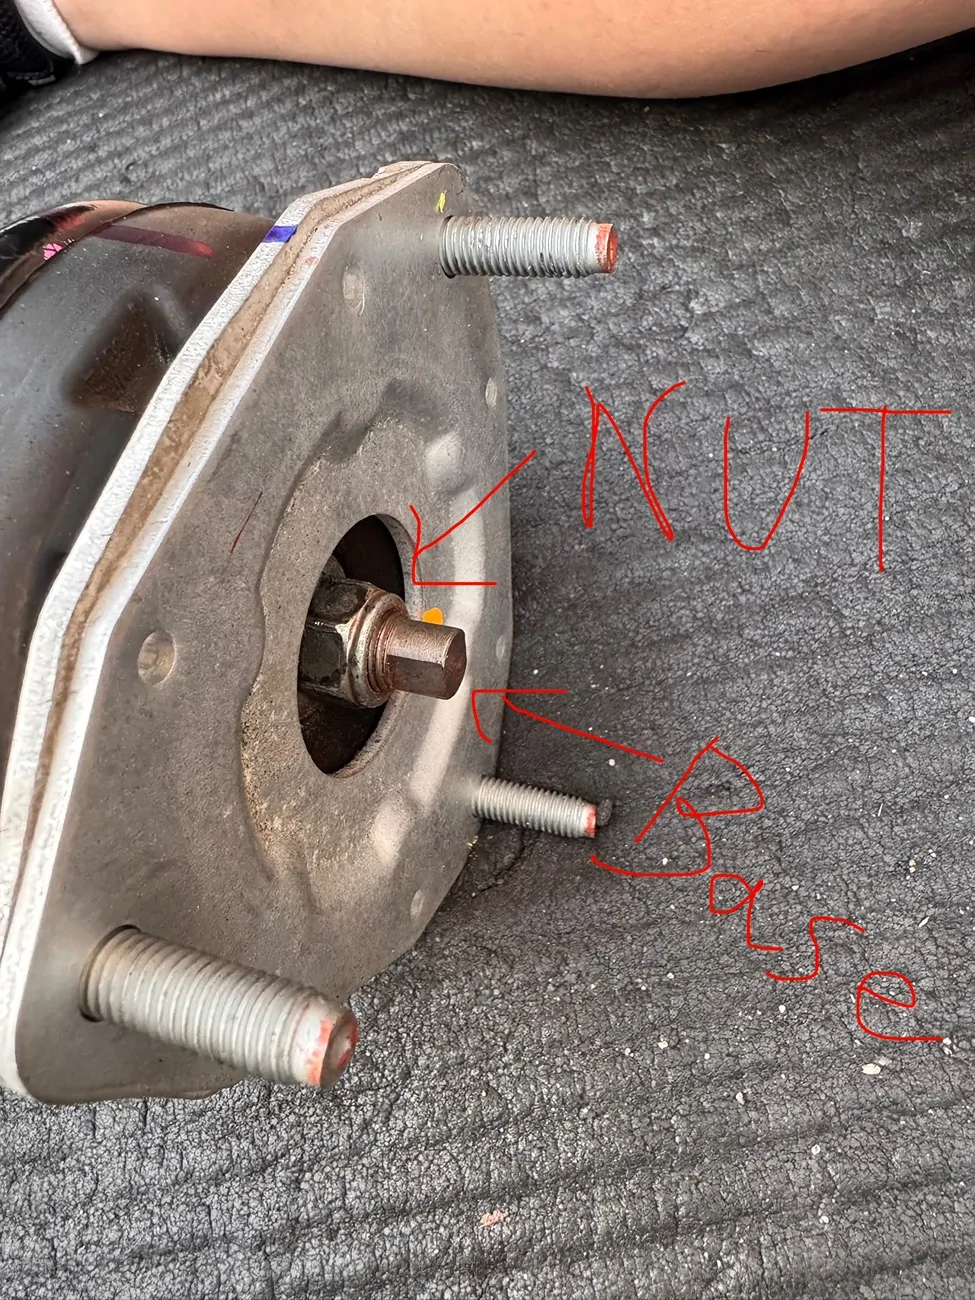
I want to know what I did wrong or what I should have done for future reference. And one more thing. On my right strut when I loosened the nut on the top rubber mount, the square off stem/base was loosening as well when I loosened the nut ( will have a second pic showing what I’m talking about). When I was retightening with the new spring on I just tightened and held the base in place as I was tightening the nut. What does that base/stem do? Should I be worried it was loosened at first?

I know it’s a read and I appreciate you guys helping me out. Tomorrow I’ll swap out the rear springs, judging from videos it looks a lot more simple to do than the fronts, fingers crossed 🤞🏼.

IMG_3785.webp


IMG_3799.webp
 

Drago86

Well-Known Member
Joined
Jun 4, 2024
Threads
6
Messages
213
Reaction score
236
Location
California
Car(s)
Z
For non-adjustable coil overs you would have to clock the shock and top hat to the proper position, just copy the same orientation you took off the car, best to mark it when you take it off.

For the spinning, that's why the stem is "squared off" to hold it with a wrench when you loosen or tighten that nut. That squared off part is the shocks rod itself that carries the piston head, valving and seals and stuff, spinning it too much can be bad for the seals. If you just spun it slowly a little, it's probably fine.

Good job working through it though, everyone has to learn their first time doing something new. I usually budget 3x the time estimate if it's the first time attempting something as usually something will come up I have to research/buy a tool for etc.
 
OP
OP

KelvinllMelvin

Active Member
First Name
kelvin
Joined
Dec 5, 2025
Threads
13
Messages
30
Reaction score
27
Location
NY
Car(s)
Nissan z
For non-adjustable coil overs you would have to clock the shock and top hat to the proper position, just copy the same orientation you took off the car, best to mark it when you take it off.

For the spinning, that's why the stem is "squared off" to hold it with a wrench when you loosen or tighten that nut. That squared off part is the shocks rod itself that carries the piston head, valving and seals and stuff, spinning it too much can be bad for the seals. If you just spun it slowly a little, it's probably fine.

Good job working through it though, everyone has to learn their first time doing something new. I usually budget 3x the time estimate if it's the first time attempting something as usually something will come up I have to research/buy a tool for etc.
Appreciate it, indeed took a lot longer than expected but happy I got the hard part out of the way. I should have marked it when taking off the old one like you said. Good to know for next time.
 

VR30Infection

Well-Known Member
Joined
Jul 21, 2024
Threads
0
Messages
514
Reaction score
479
Location
California
Car(s)
24'Z Performance, 67' Barracuda
You just organically struggled through the same situation as MANY “do it yourself” guys have gone through. It’s one of those things that you learn from and get better at things as you work through them. It’s hard work and frustrating but it’s worth its weight in gold! Saving yourself hard earned money along the way. Good for you for pushing through and not being too prideful to ask questions. The rear is much easier. A good rule of thumb is to get a paint marker of some kind and always mark alignment on anything you take apart so you have an easier time. Can’t wait to see the finished product! And don’t forget to go get an alignment ASAP so you don’t kill your tires. 👍🏼👍🏼
 

Drago86

Well-Known Member
Joined
Jun 4, 2024
Threads
6
Messages
213
Reaction score
236
Location
California
Car(s)
Z
You just organically struggled through the same situation as MANY “do it yourself” guys have gone through. It’s one of those things that you learn from and get better at things as you work through them. It’s hard work and frustrating but it’s worth its weight in gold! Saving yourself hard earned money along the way. Good for you for pushing through and not being too prideful to ask questions. The rear is much easier. A good rule of thumb is to get a paint marker of some kind and always mark alignment on anything you take apart so you have an easier time. Can’t wait to see the finished product! And don’t forget to go get an alignment ASAP so you don’t kill your tires. 👍🏼👍🏼

I've recently run into a related unexpected problem: After my coilovers the car is now too low to fit on anyone locals' alignment rack/ramps. I tried every place in town (smallish) and now have an appointment booked 2 weeks out at a shop that specializes in performance/race cars that has the correct alignment rack for lowered cars. I'm not even that low ~1 inch.

Live and learn.
 

VR30Infection

Well-Known Member
Joined
Jul 21, 2024
Threads
0
Messages
514
Reaction score
479
Location
California
Car(s)
24'Z Performance, 67' Barracuda
I've recently run into a related unexpected problem: After my coilovers the car is now too low to fit on anyone locals' alignment rack/ramps. I tried every place in town (smallish) and now have an appointment booked 2 weeks out at a shop that specializes in performance/race cars that has the correct alignment rack for lowered cars. I'm not even that low ~1 inch.

Live and learn.
Yup, I’ve ran into the same thing. One shop just looked at the car from 100 ft away and said “nope”. lol.
 

FSUZ33

Well-Known Member
First Name
Chad
Joined
Feb 23, 2025
Threads
42
Messages
1,450
Reaction score
1,711
Location
Tallahassee, FL
Car(s)
‘24 Z NISMO
Might be calling this early, as it’s barely April, but I’m saying you win the award for “2026 - Cleanest Backside of a Brake Caliper.”
 

FSUZ33

Well-Known Member
First Name
Chad
Joined
Feb 23, 2025
Threads
42
Messages
1,450
Reaction score
1,711
Location
Tallahassee, FL
Car(s)
‘24 Z NISMO
For non-adjustable coil overs you would have to clock the shock and top hat to the proper position, just copy the same orientation you took off the car, best to mark it when you take it off.

For the spinning, that's why the stem is "squared off" to hold it with a wrench when you loosen or tighten that nut. That squared off part is the shocks rod itself that carries the piston head, valving and seals and stuff, spinning it too much can be bad for the seals. If you just spun it slowly a little, it's probably fine.

Good job working through it though, everyone has to learn their first time doing something new. I usually budget 3x the time estimate if it's the first time attempting something as usually something will come up I have to research/buy a tool for etc.
I’m sure there are other ways, but the few times I’ve done it when the nut was buried in the hat, I held the rod with a crescent and loosened/tightened the nut with an offset wrench.

IMG_0259.webp
 

2Cool

Active Member
First Name
Ian
Joined
Dec 3, 2025
Threads
1
Messages
35
Reaction score
77
Location
Florida
Car(s)
2024 Nissan Z Performance
Mark everything, install the bottom bolt first but leave the nut loose, you can get some twisting with the spring and tophat to get it to align up top after.

This was my first Z car suspension swap, so everything was new. I definitely like how relatively simple the spring swaps were without any need to pop a balljoint or similar act. Rear was absolute cake with only the one control arm end bolt to remove. The front swaybar endlink bolt also being the shock bolt had me scratching my head for a bit, first time seeing that, especially as the length made alignment critical for reassembly. Do wish they had gone with a bearing mounted top hat to allow rotation when assembled.


Top