Sponsored

Sport Model: audio solution thread

Mugzilla

Well-Known Member
First Name
Matt
Joined
Apr 4, 2024
Threads
56
Messages
595
Reaction score
656
Location
Short Hills, NJ
Car(s)
2024 Z Sport (MT)
Occupation
printer repair man
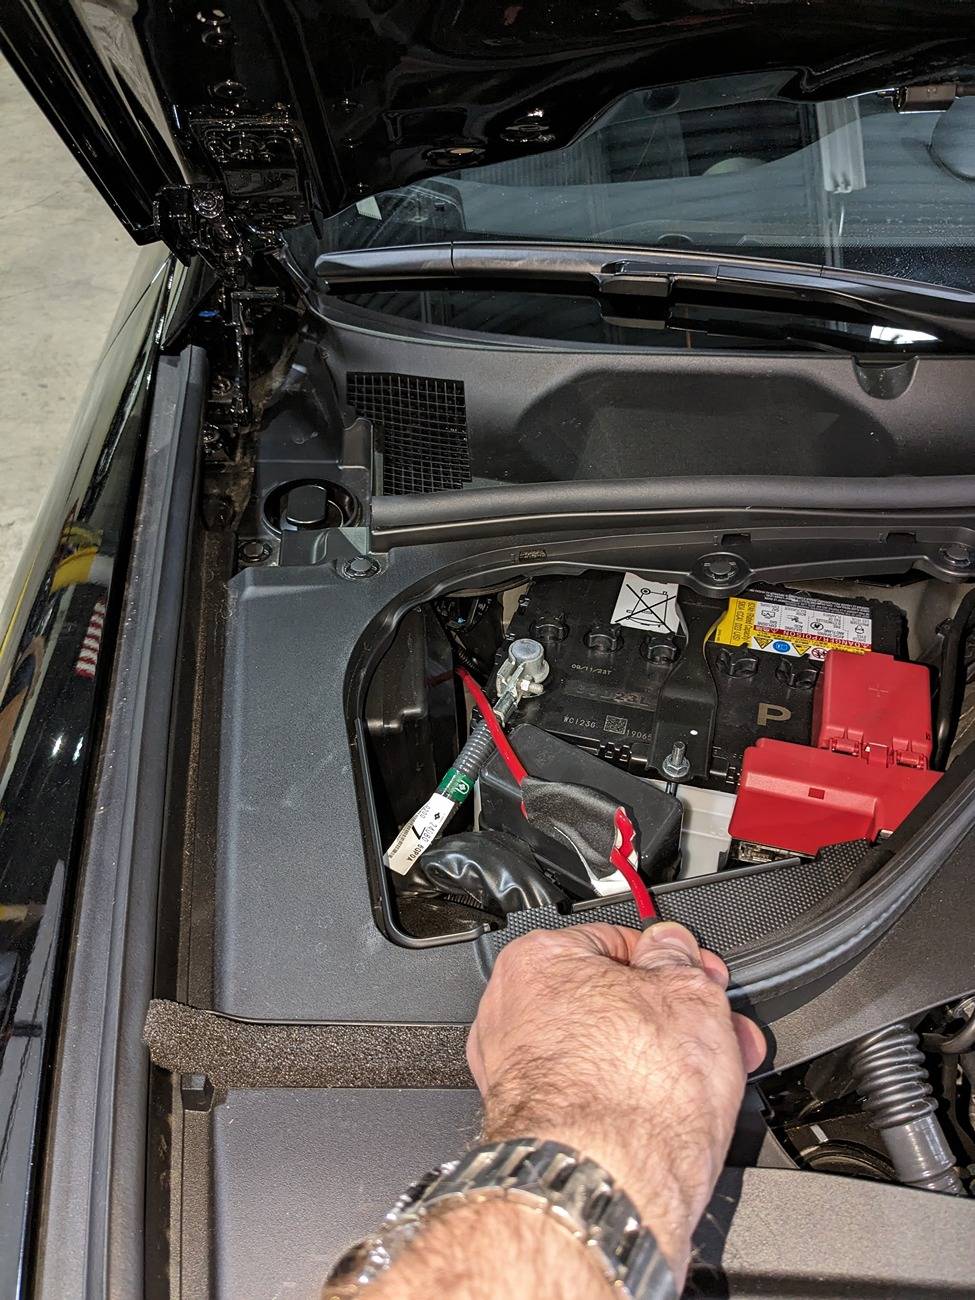
Seems there is 3-5 different threads on how crappy the Nissan Z’s standard AND BOSE systems are. The crappy audio wasn’t something I tried out on the test drive. It isn’t a dealbreaker. However, it needed to be fixed.

I will write what I did to replace all 6 speakers in my 2024 Nissan Z Sport MT. Please feel free to copy/paste, and reply with things I can add to improve it. If someone wants to use my work as a stepping stone to do a “un-crapify the B(L)OSE system”, be my guest. (@Mr. Mac has a DYNAMITE thread involving the B(L)OSE system . However, well,... I'll let you guys read it BOSE-BE-GONE!)

You’ll notice I have recycled pictures from other users. I contacted them ahead of time, asked for permission, and have cited them and the original thread they came from. (I've messaged them. I'll see what they say...)

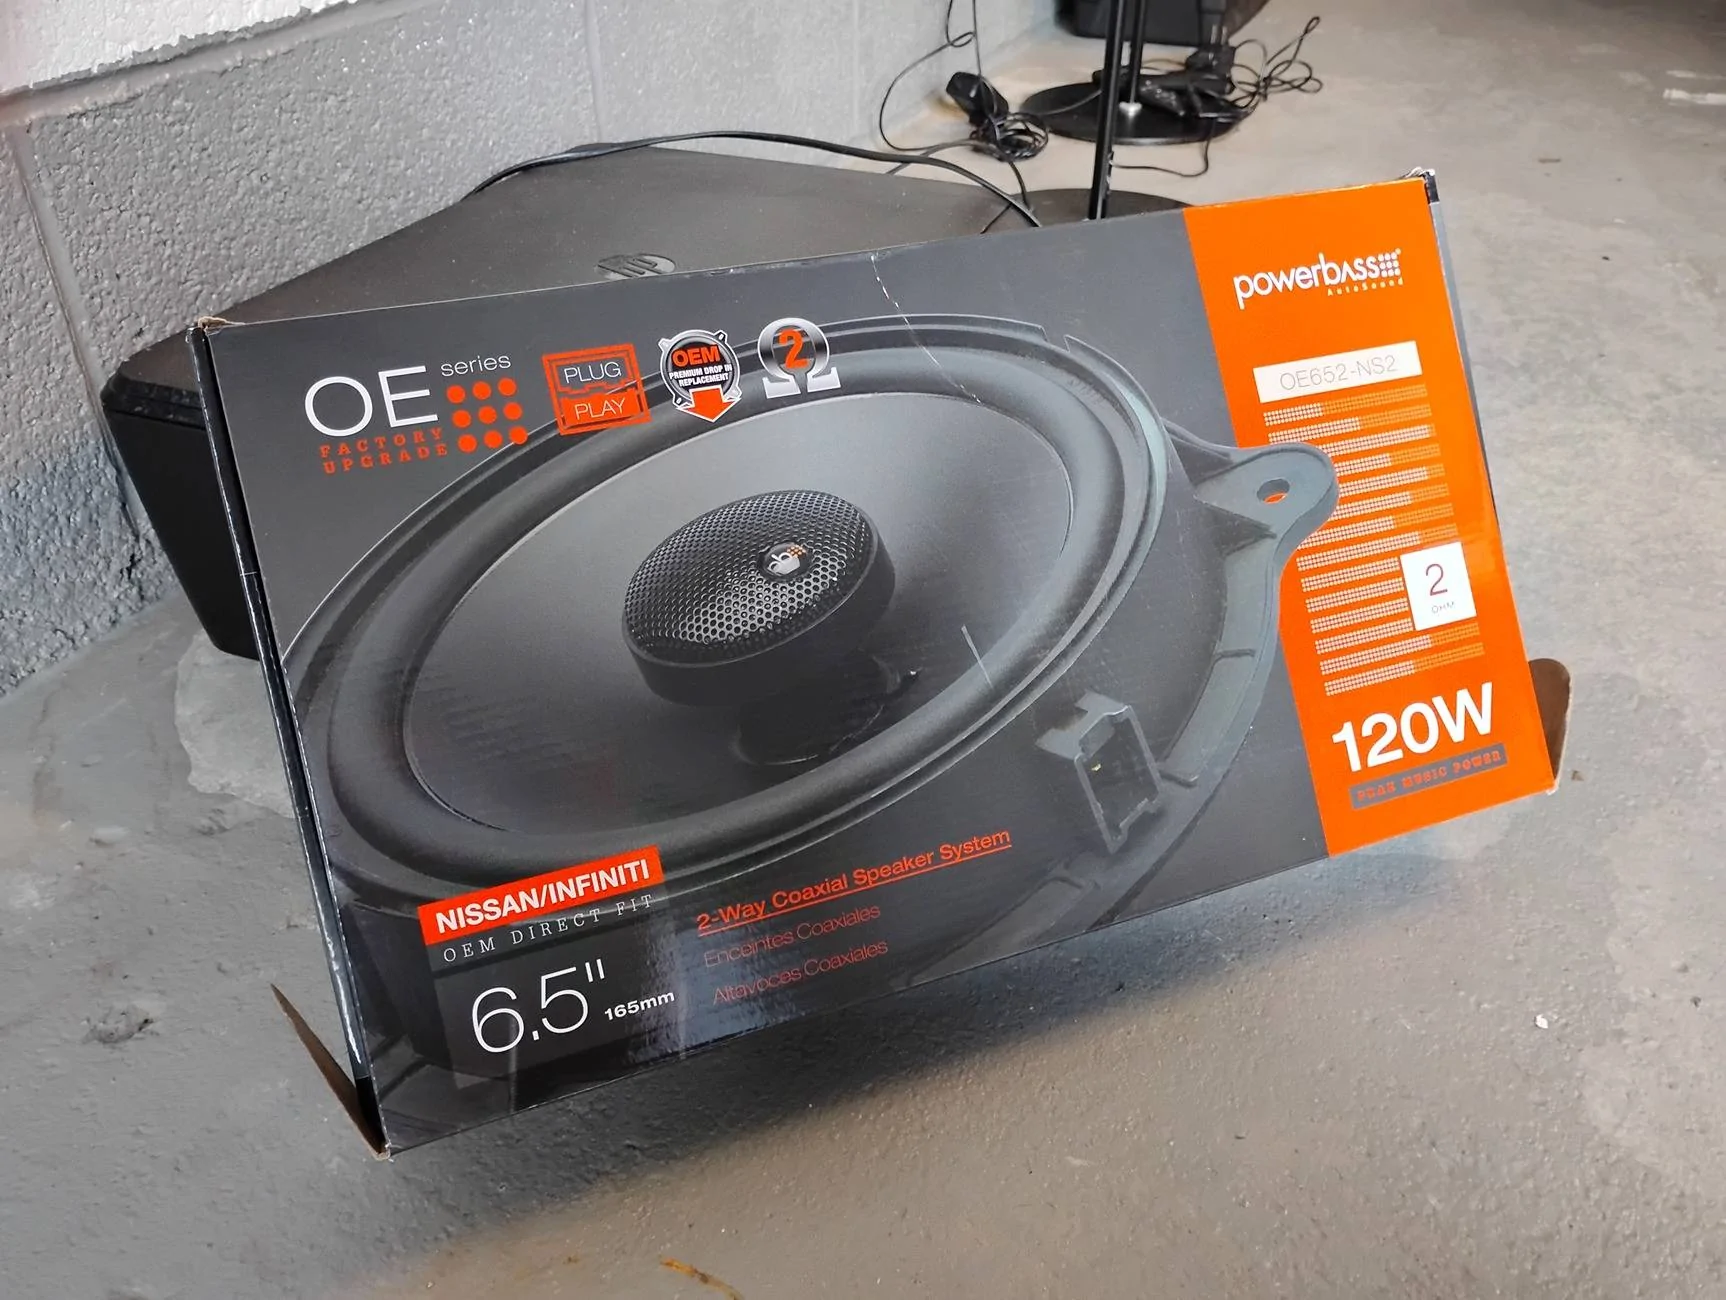
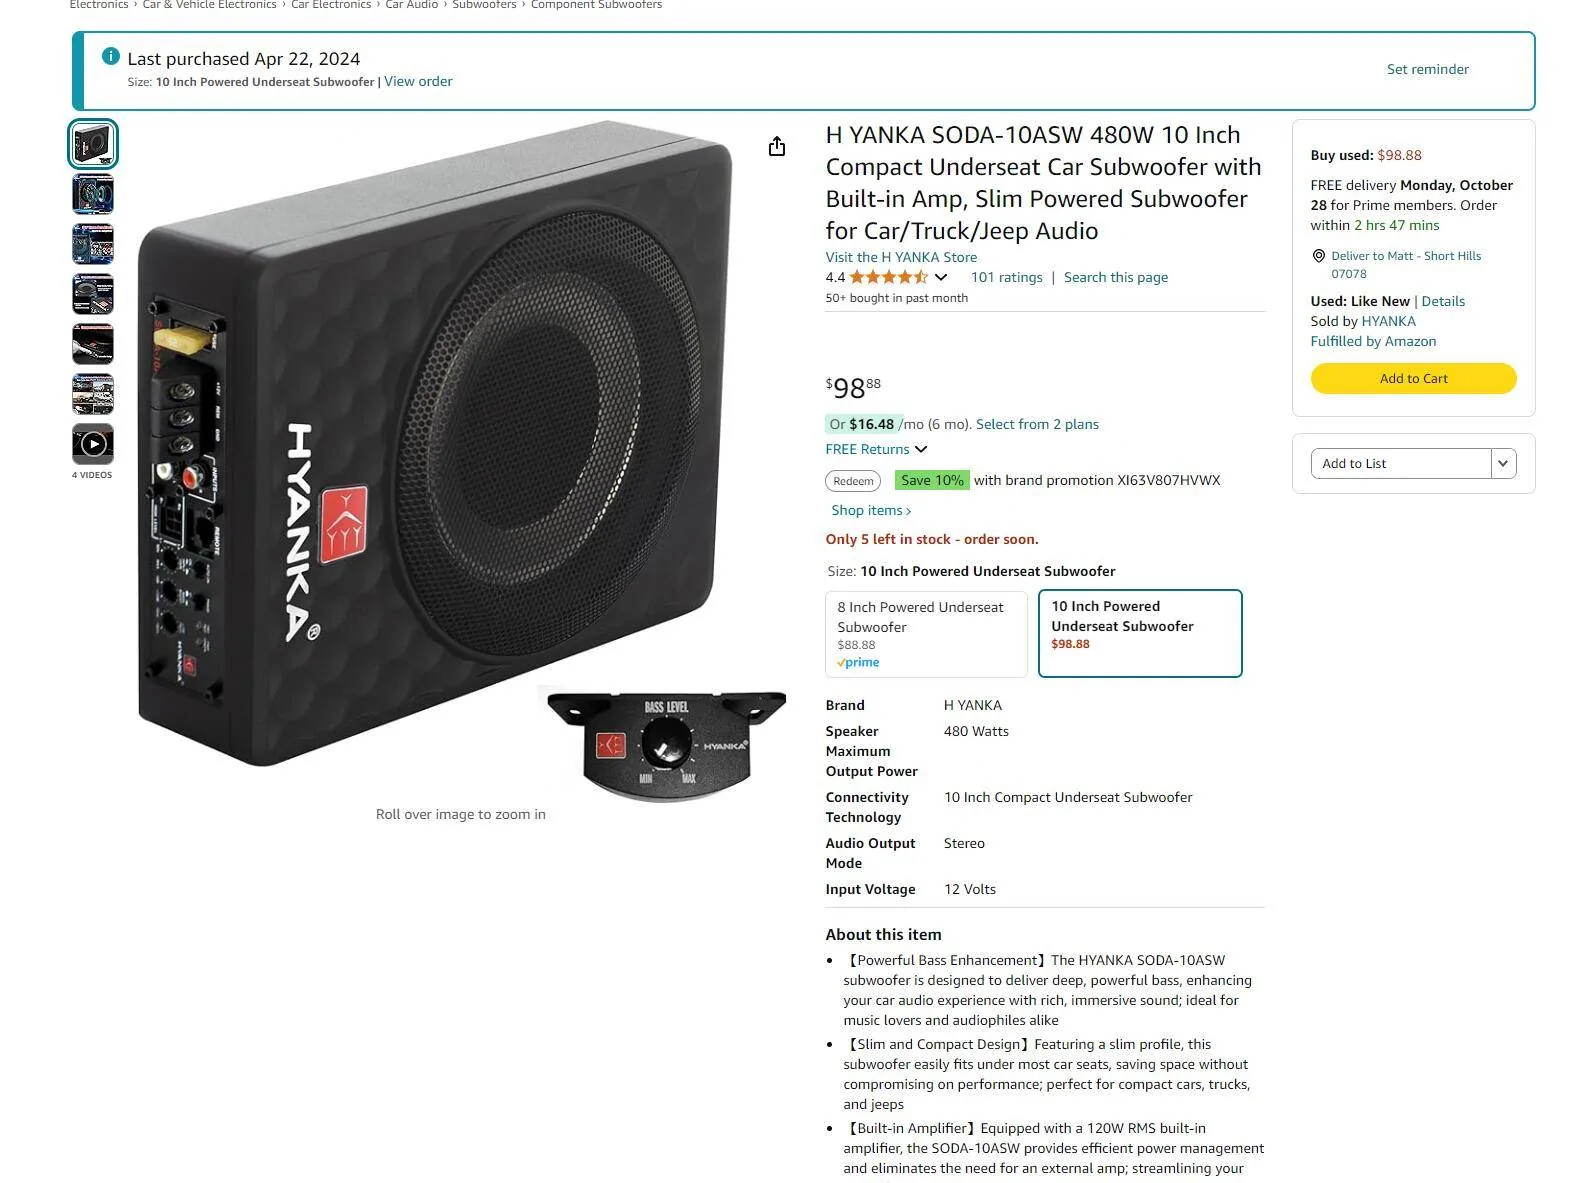
I’ll include a list of the parts I used. Yeah, there are higher end speakers out there. However, the ones chosen are logarithmically better than the stock ones. I’m not an audiophile, and have hearing loss. (So I won’t be cranking it up much.). Some have mentioned to use 2 ohm speakers. I’ll invite them to post their speaker recommendations and why. If you see “ASIN”, it is an Amazon stock number. If you search for said ASIN number on Amazon, it should come up, even if it is discontinued.


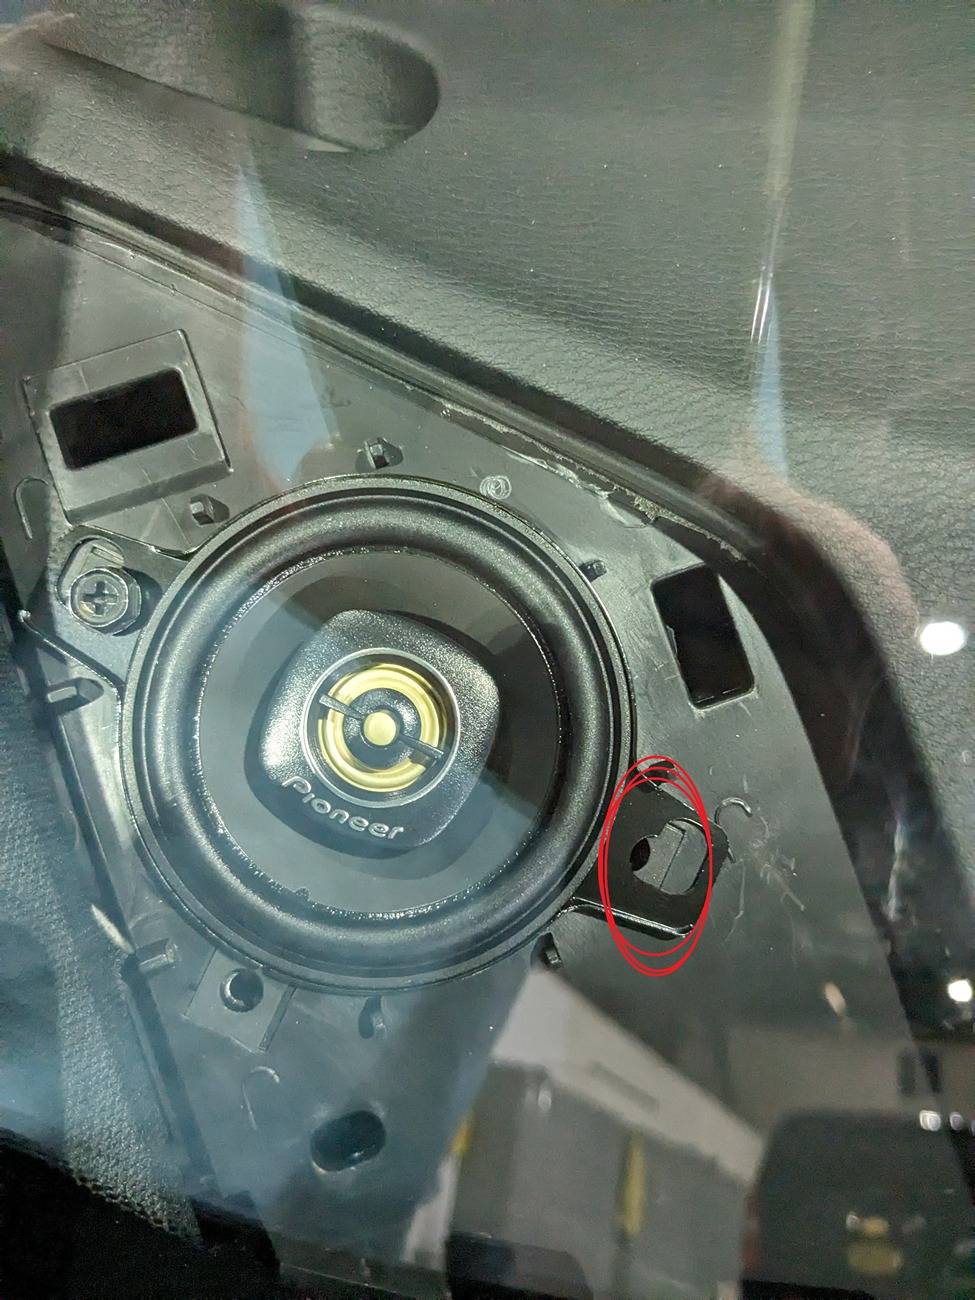
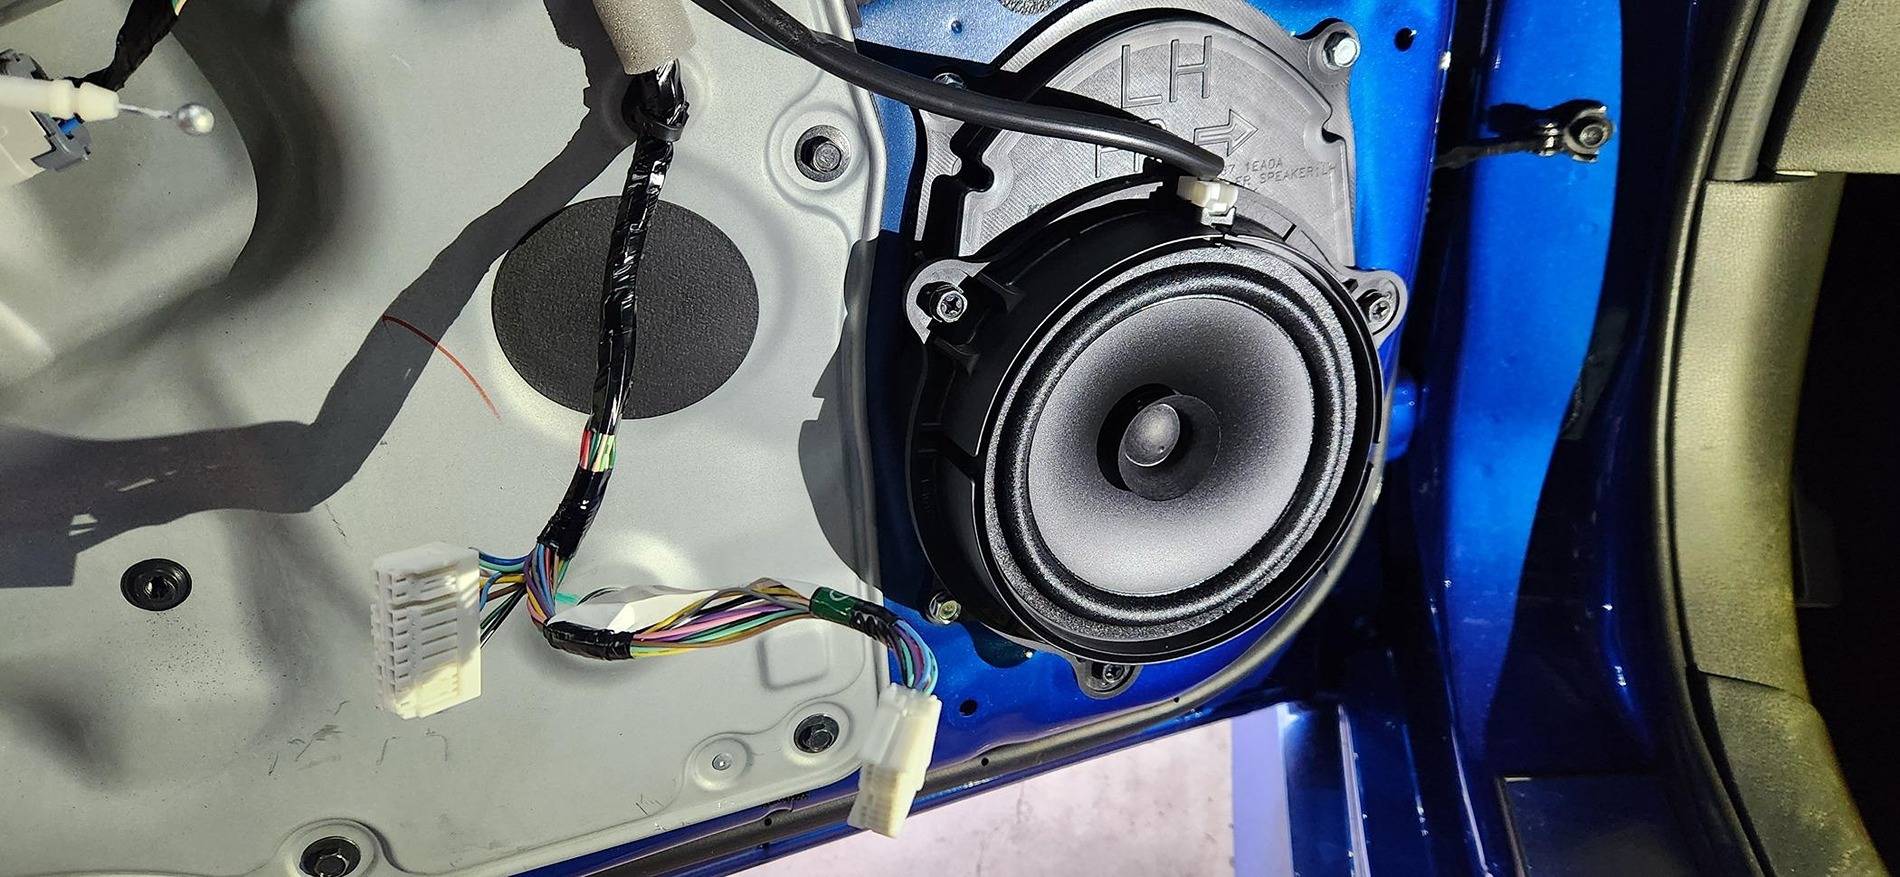
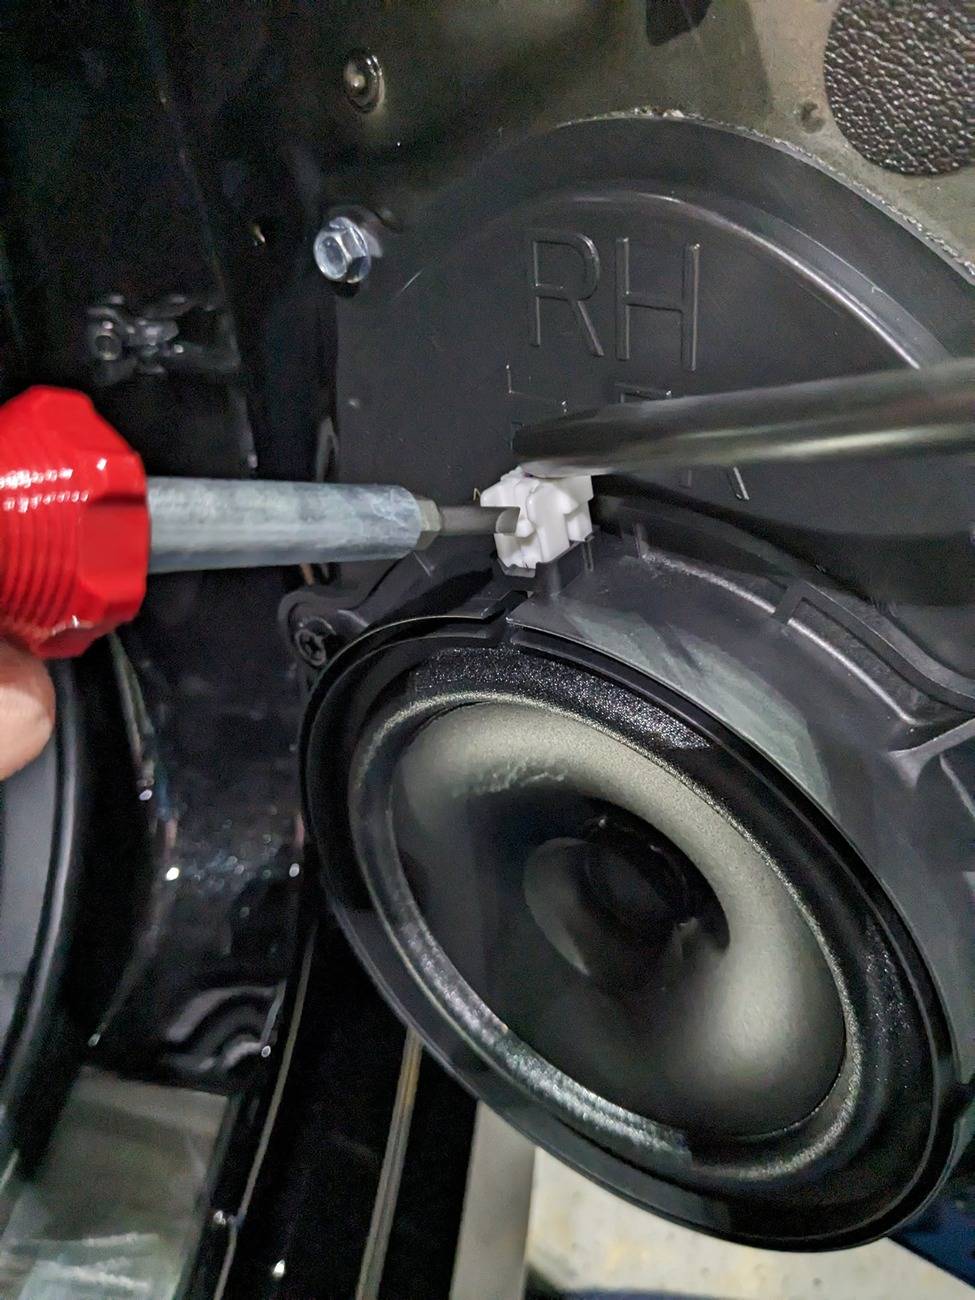
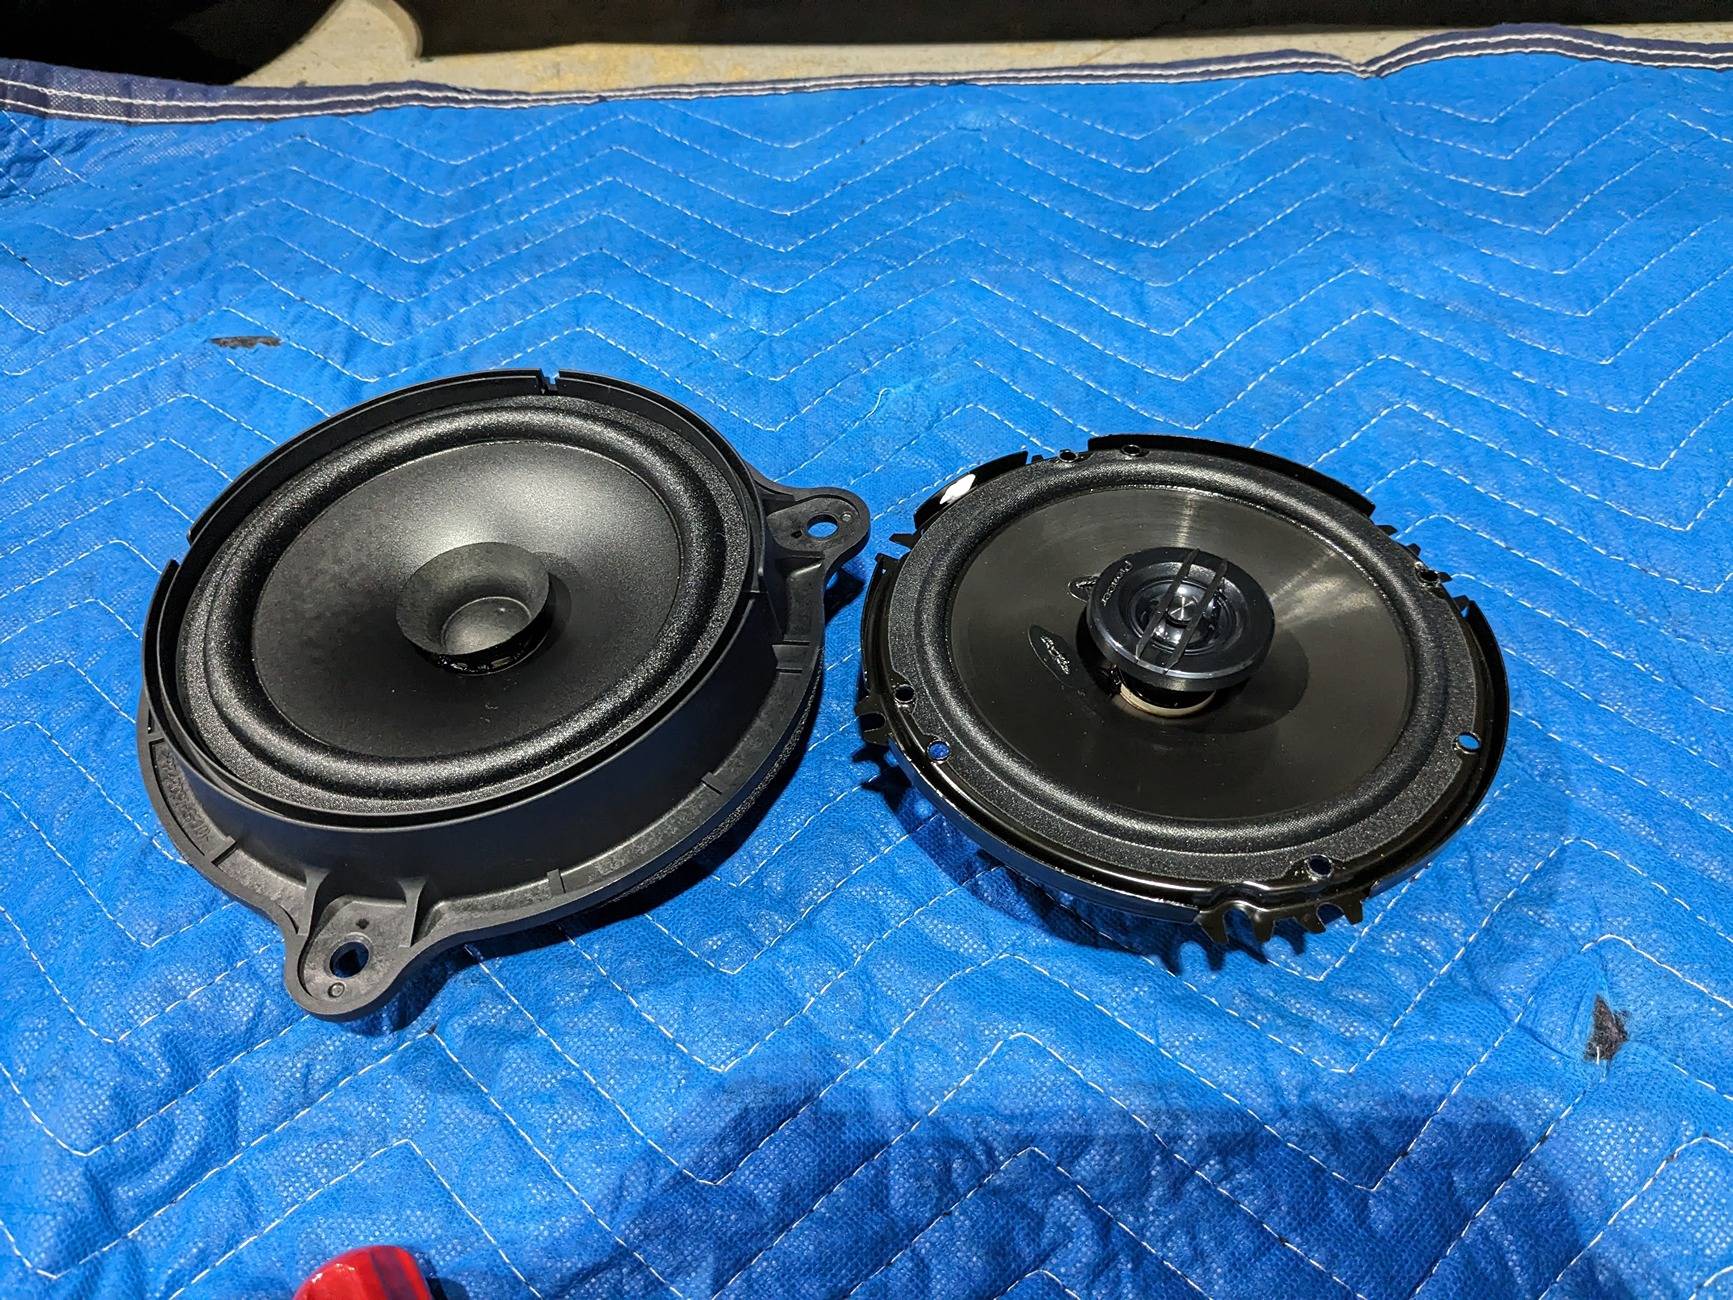
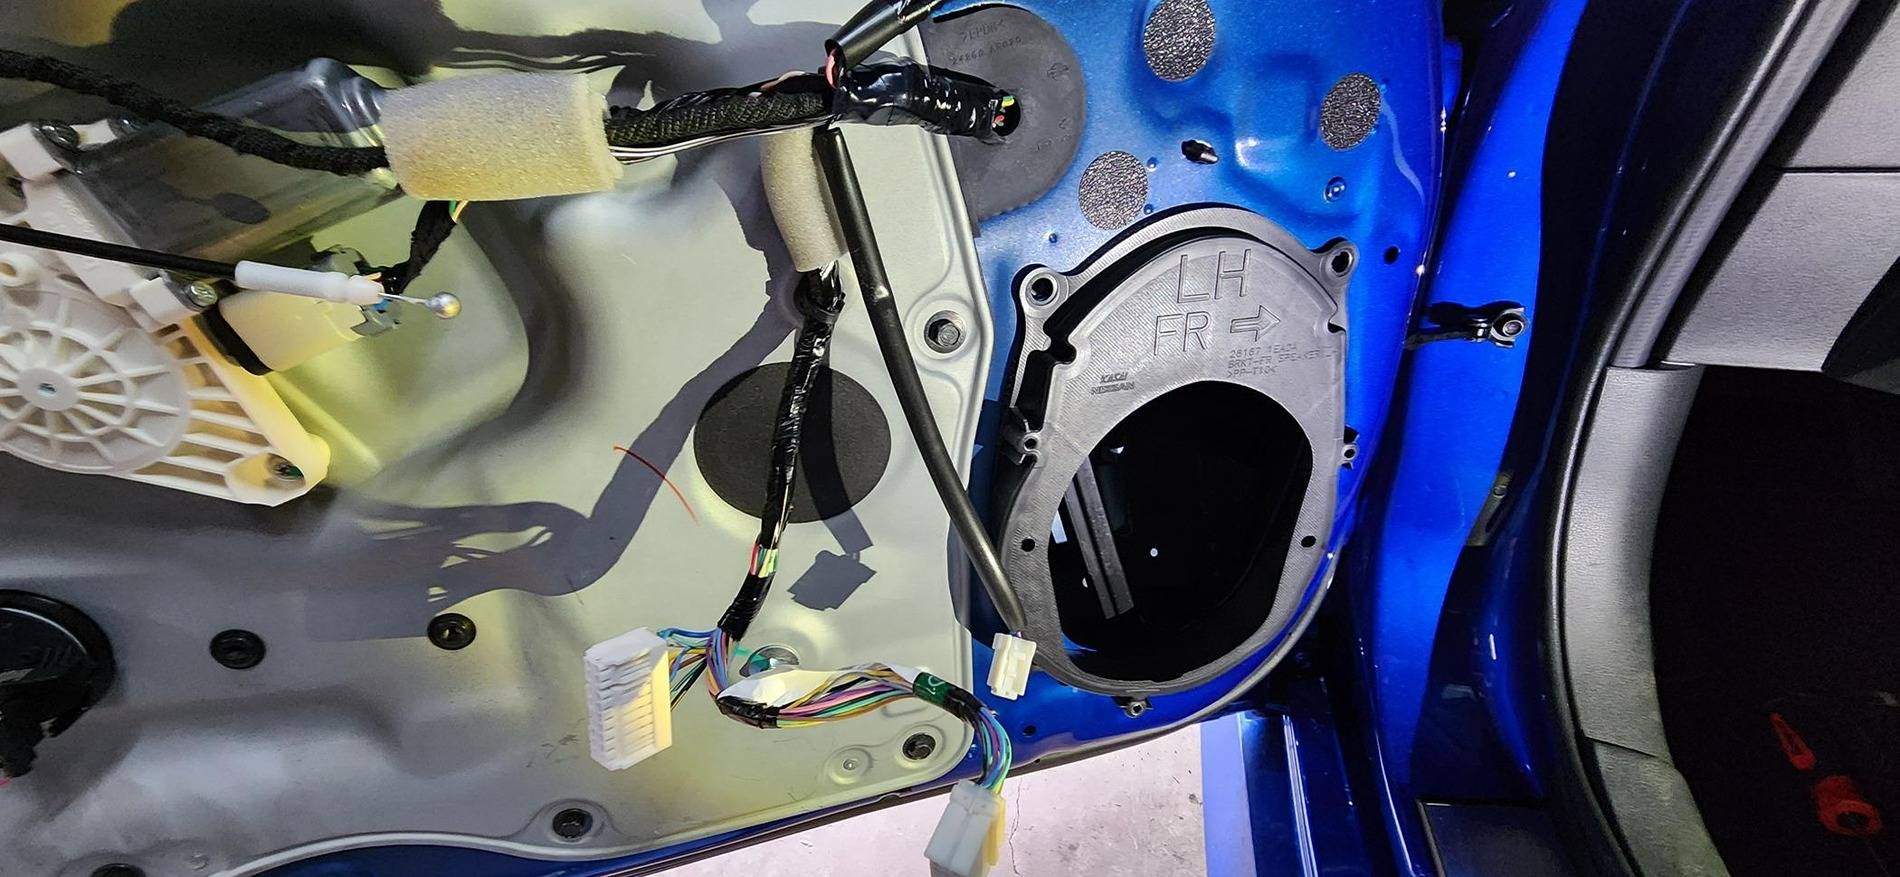
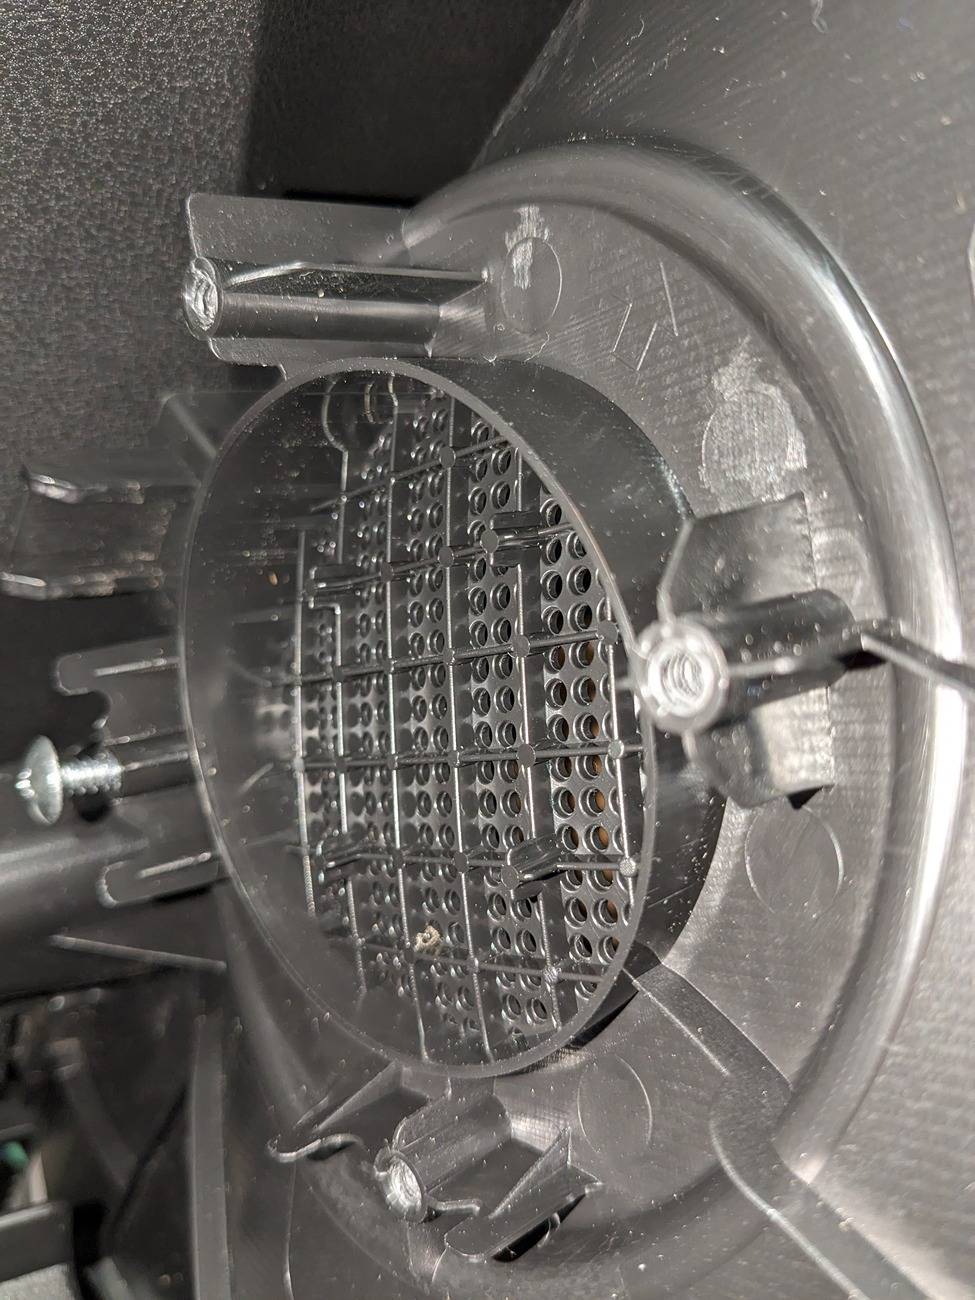
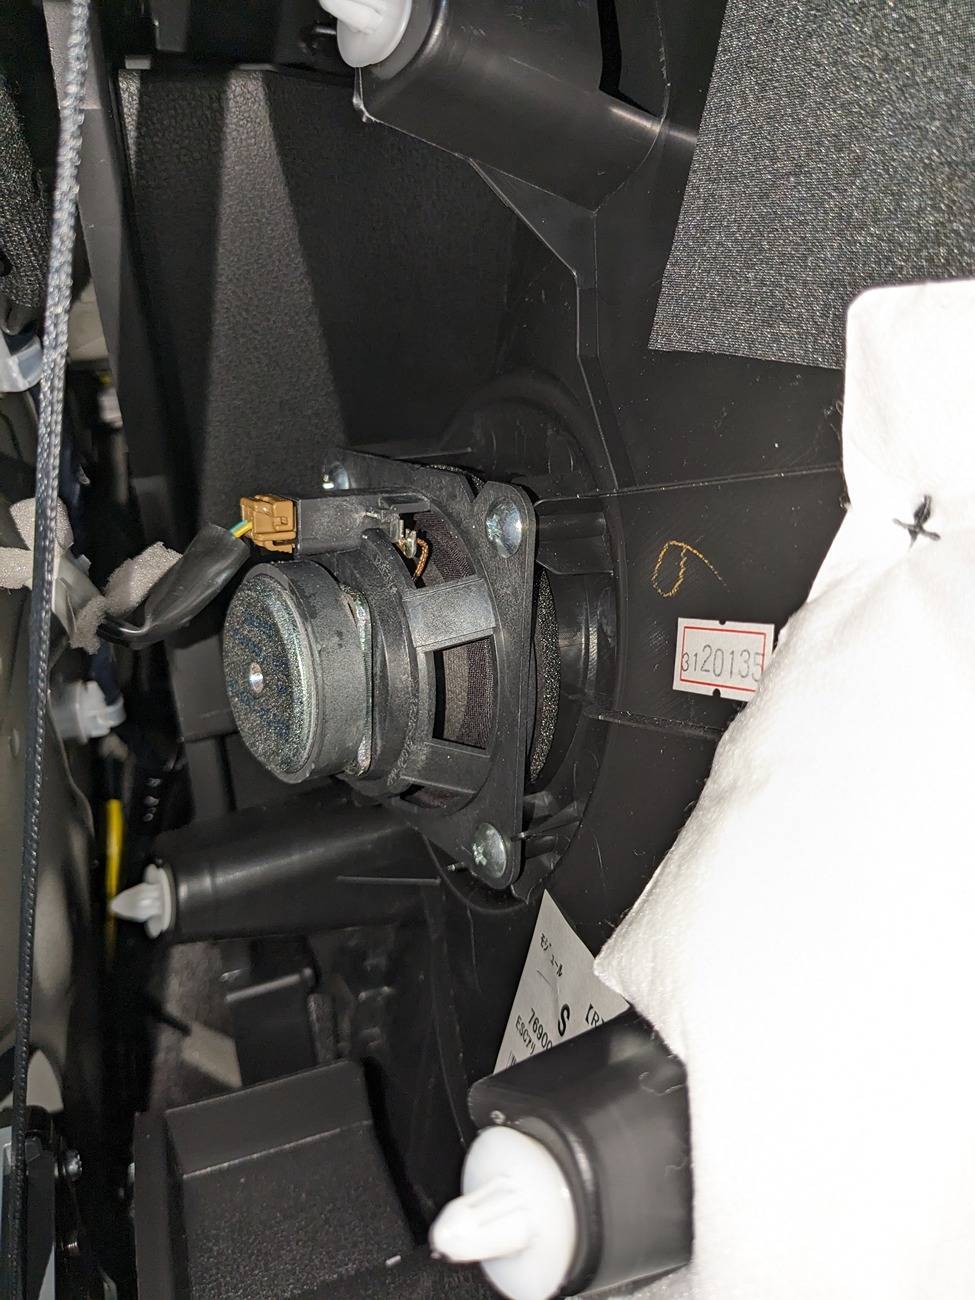
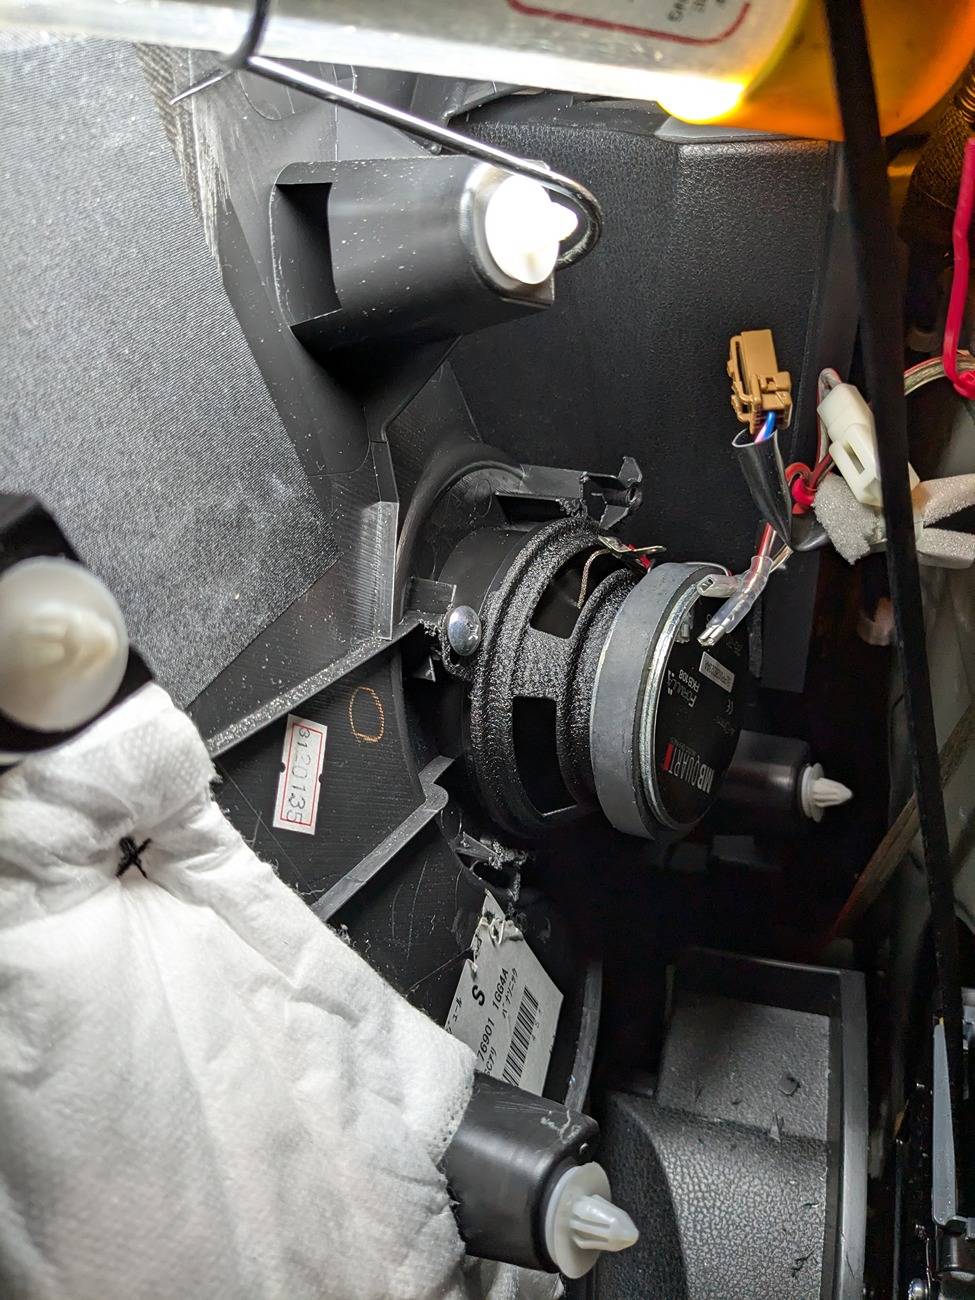
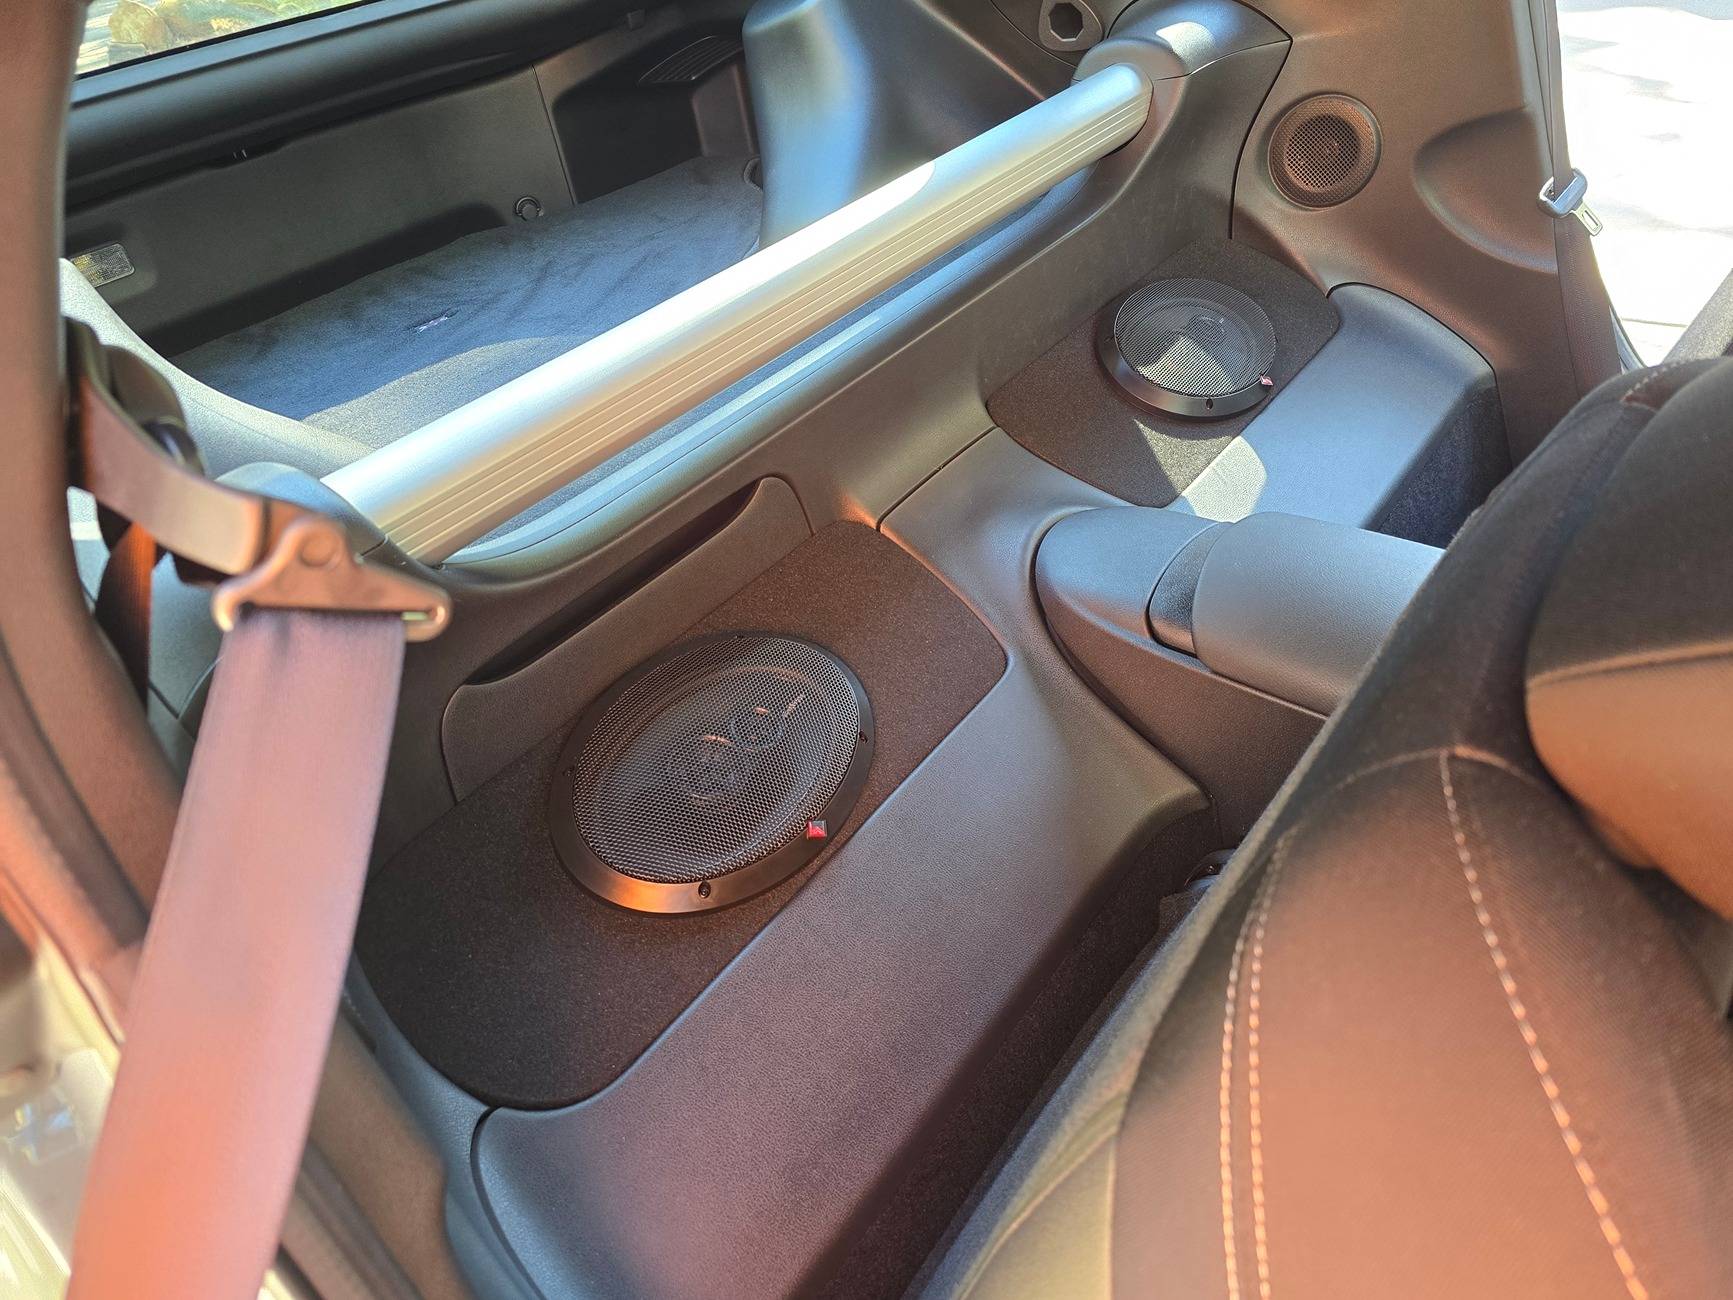
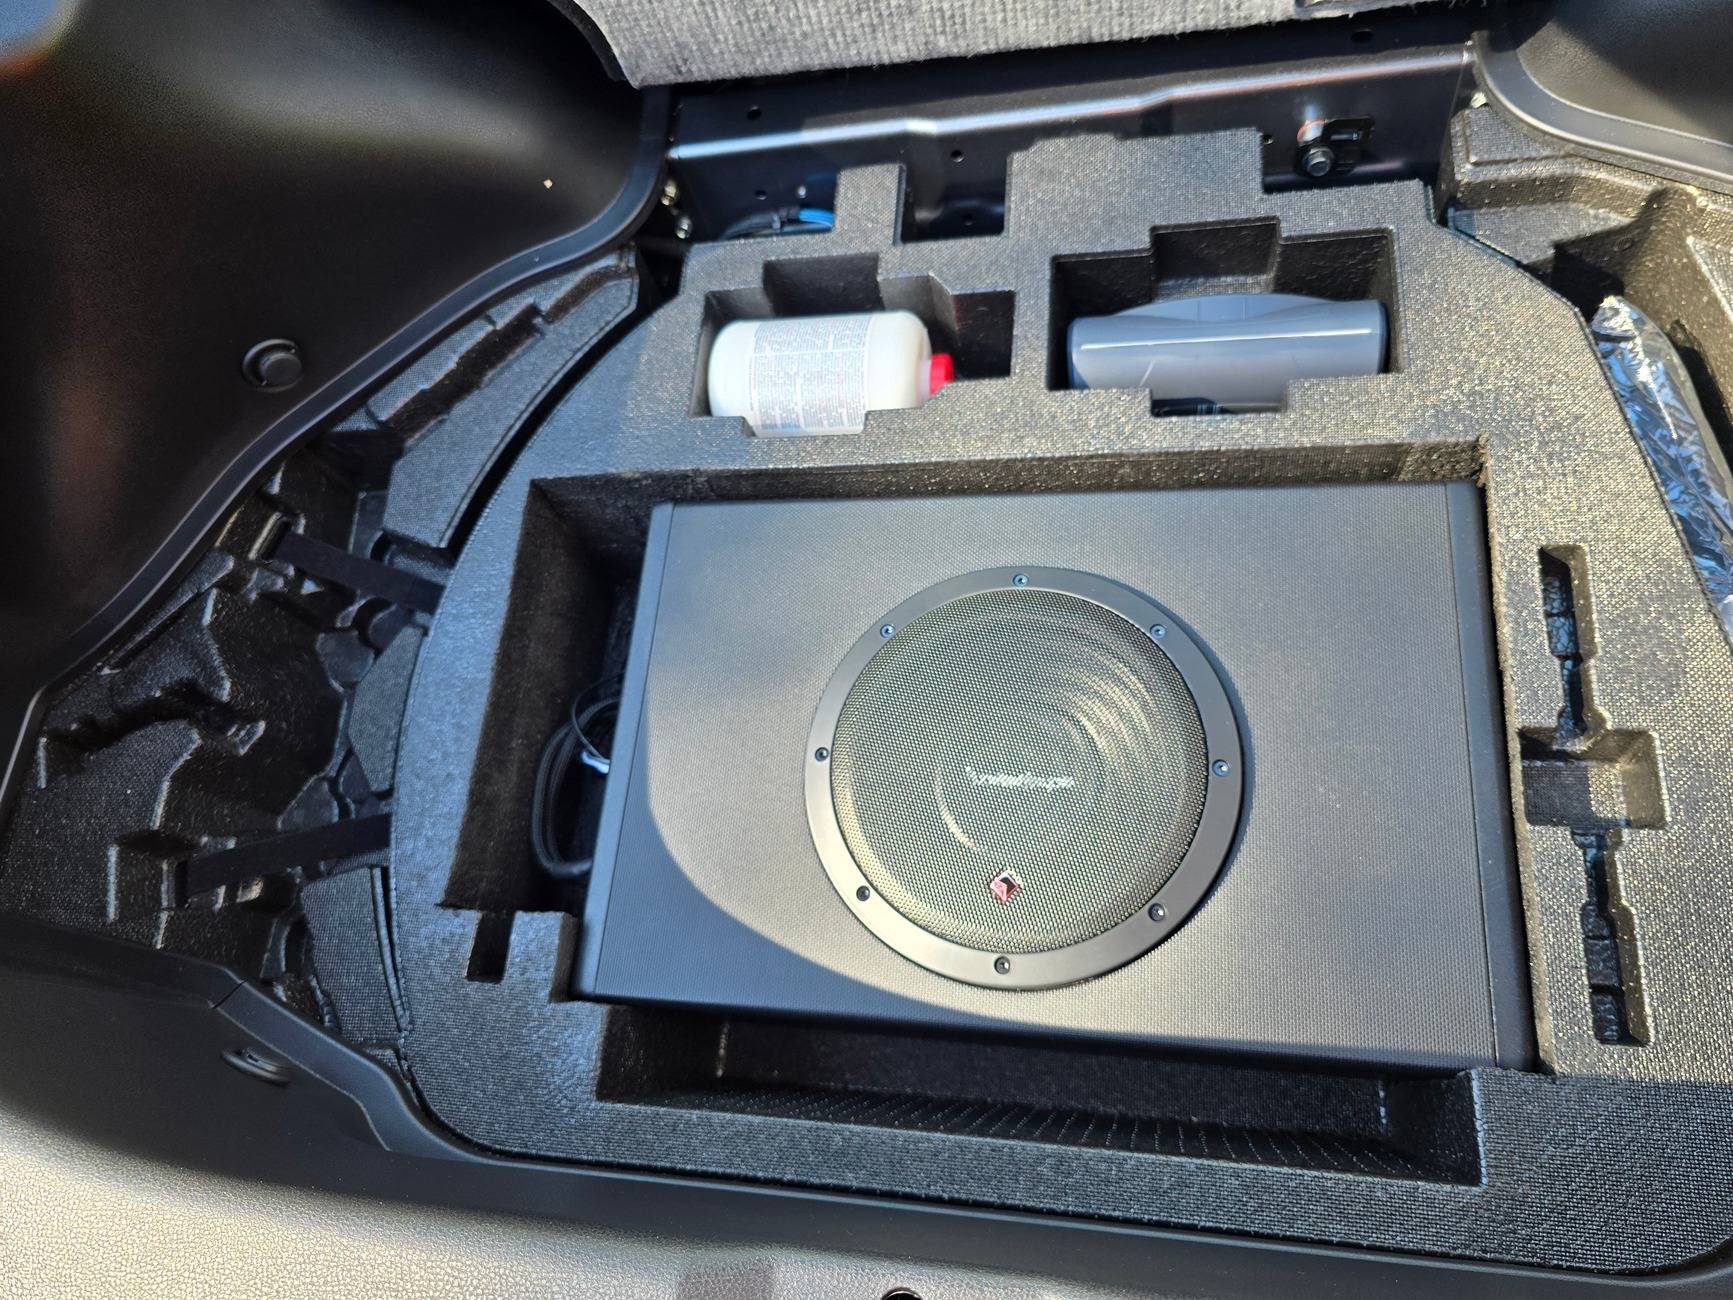
The 2023 – 24 Nissan Z sport has SIX speakers in its audio system. Two, 2.5” speakers in the dash, two, 6.5” in each door, and two 3.5” behind each seat mounted TO the body molding. There is a seventh in the dash for chimes, announcements, etc.
 
Last edited:
OP
OP
Mugzilla

Mugzilla

Well-Known Member
First Name
Matt
Joined
Apr 4, 2024
Threads
56
Messages
595
Reaction score
656
Location
Short Hills, NJ
Car(s)
2024 Z Sport (MT)
Occupation
printer repair man
DASH SPEAKERS:

Replacement parts used:

Pioneer 2.75” speakers, model TS-A709 Amazon ASIN B09VR5N1FN

RED WOLF speaker harness (2 pcs). ASIN B08VJ7NZYY (We are checking this now. Exquisite_Red will LMK when he gets his plugs in.)


Replacing these speakers was the most bang for my buck. Period.

I went with 2.75” speakers because I thought, “They’ll squeeze in there, right?!” Wrong. Had to do a bit of trimming, but it was easy.

Here is a pic of ONE screw installed. The other hole? Partially obstructed in RED:
PXL_20240414_174015962.jpg


First, use a plastic prybar to remove the dash speaker grill. A stubby Philips screwdriver will remove a few of the screws. I needed to use an ?? mm socket and driver to get the ones out closest to the windshield.

With the screws out, remove the clamp nuts. Use an exacto knife to cut the dash so they can move OUTWARD to allow the extra 0.25” from the 2.75” speaker to fit between them. Replace the nut clamps, and ensure your speakers fit in the holes.

Terrible pic taken BEFORER switching to the exacto. You get the point; remove some material so the nut clamp can slide out form 2.5" to 2.75::

PXL_20240414_185719431.jpg


These Pioneer speakers come with bass blockers. ENSURE POLARITY IS CORRECT when attaching them to the RED WOLF harness. I prefer to strip, solder, and heatshrink the wiring. Tape the bundle of wires together. If you want style points, affix that bale of wires inside the dash with dynamat or equivalent.

(If you still have the right grill off, this would be a great time to run a USB power cable up the right A arm.) This can be used to power a dash cam! It is easier to remove the A arm cover panel with the grill removed. You can swing and rotate the pillar cover and fish the correct usb cable. I recommend fishing the SMALL end of the USB cable upward, instead of fishing the big end downward.)

Attach the wires to the speakers. Install speakers. Tighten them down with the screws. TEST THE SPEAKERS BEFORE slapping the grills back on.

It WOULD have been much, much, MUCH easier to replace if I would have just bought 2.5” speakers. What can I say? I’m a slave to Pioneer’s marketing.

OTHER THOUGHTS IN NO ORDER: When dropping the speakers in the dash, you may have to use the exacto to remove the vertical tabs that held the square speaker from rotating so the new ones sit flush. The TINY speaker on the drivers side is for chimes, and some announcements. Don’t leave little bits of plastic on top of the tiny speaker after trimming like I did.
 
Last edited:
OP
OP
Mugzilla

Mugzilla

Well-Known Member
First Name
Matt
Joined
Apr 4, 2024
Threads
56
Messages
595
Reaction score
656
Location
Short Hills, NJ
Car(s)
2024 Z Sport (MT)
Occupation
printer repair man
DOOR SPEAKERS:

Special thanks to @Exquisite_Red for noting that the 6.5" door speakers are 2 ohm!!!!

I am leaving all references to the 4 ohm speakers, and the pictures. Let it be known though, that the PowerBass speakers are a one-for-one swap out for stock. This makes this section stupid easy.

Pioneer 6.5” speakers, model TS-G1620F ASIN B07595G6H7

PowerBass OE652-NS - 6.5" Direct Fit - Nissan OEM Coaxial Speakers - pair ASIN: B096JF4J26

https://www.amazon.com/Powerbass-OE...840177&sr=8-22&srs=3039006011#customerReviews

IMG_20250401_184135318.webp

RED WOLF speaker harness (4 pcs). ASIN B07PR6PFXR Not needed with the power bass oem speakers, as they use the factory plug. BUT, if you are using aftermarket speakers, and don't want to cut the harness, this is your jam.

Speaker rings: B072HSN162 NOT needed with the PowerBass speakers

Foam rings: ASIN B0CKX8TKGT NOT needed with the PowerBass speakers


Remove the triangular plate behind the interior door open handle. Remove the plate inside the door pockets. 10 mm socket to remove the three bolts. Use a plastic prybar to remove the door. Start at the corner of the door nearest your butt.

The door panel pops off pretty easily. Use a small flathead to push on the big molex connector where indicated. It will then slide out. (Thanks to Who.Am.Eye.2716 for the pic. He disconnected the big molex connectors AND the door pull cable.)

door1.jpg


Disconnect speaker wire molex connector by pushing the release.
PXL_20240414_165554605.jpg

Remove the crap speaker. Install the spacer and the new speaker. Find a spot to run the new speaker wire harness between the spacer and the 6x9 spacer. Tape/dynamat the wires down so they don’t rattle. Install the foam ring so it seals between the door panel and the outer part of the new speaker.

You need the speaker ring and the foam rings. Otherwise, your new door speakers will be 3" from the speaker grill, and you'll be flooding the INSIDE of your door panel with sound.

PXL_20240414_171351400.jpg


TEST THE SPEAKER BEFORE reinstalling the door panel. After a successful test, write your name inside the door. Why? Show pride in your work.

Reattach the molex connector to door panel. Reinstall the door panel. Put the 10mm bolts back in.

OTHER THOUGHTS IN NO ORDER: I thought of installing 6x9 speakers in the door instead of 6.5”. When you see the plastic plate the 6.5” speakers are connected to, you’ll thjink it’s a good idea too. BUT, I could not find a 6x9 spacer online, so I stuck with 6.5” speakers. (Thanks to Who.Am.Eye.2716 for the pic)

door2.jpg

POLARITY of the speaker wiring is important, because these 2 speakers fire directly at one another. Maske sure your replacement speaker tweeters do not bang in to the door grill!
 
Last edited:
OP
OP
Mugzilla

Mugzilla

Well-Known Member
First Name
Matt
Joined
Apr 4, 2024
Threads
56
Messages
595
Reaction score
656
Location
Short Hills, NJ
Car(s)
2024 Z Sport (MT)
Occupation
printer repair man
REAR SPEAKERS:

MB Quartz 3.5” speakers, model FKB-108 (Not on Amazon as a single pair. ALSO, their tweeters stick out pretty far, so it meant I needed to trim the grids off of the inside of the speaker grill so they wouldn’t smash up against the tweeters.)

RED WOLF speaker harness (89-06). ASIN B08BHPYQFV

24’ of good speaker wire.

The rear speakers are 3.5". The rear speakers are 3.5". The rear speakers are 3.5".

The rear speakers are the crappiest of them all. They have a capacitor soldered onto the speaker. They sound like blown 1980’s Walkman headphones cranked to 11. AND, they’re mounted to plastic.

As many others have misstated, the rears are 4.5” speakers. Whatever they are, 3.5” speakers fit diagonally perfectly in their spot.

Remove the trim that runs along the bottom of the door sill. Use a 10mm socket to remove the bolt inside the place where the tonneau cover mounts. Starting at the forward end of the trim, pop the side panel out with a plastic prybar. I DID NOT remove my trim panel completely.

THIS IS A GREAT TIME TO RUN A POWER WIRE from the engine compartment to the back for a mini subwoofer! (See pics later in the thread!)

Use a stubby Philips screwdriver to remove the speaker.

Verify you have the correct wiring harness. MODIFY the wiring harness at this time. Add a 12’ section of wire to each rear harness. Solder and some electrical tape help. Zip tying them to something is a good idea. Why? IF the added speaker wire gets tugged, they do not unplug the speaker. REMEMBER which side of the added speaker wire is + and - . You can now use these as high-level inputs for a sub in the future.

Prepare to install the new speaker. IDEALLY, the speaker circle will press against the speaker JUST outside the part of the speaker diaphram. BUT, be sure the tweeter is not MASHED against the speaker grill. I had to trim a bunch of plastic out of the inside of my grill, as I couldn’t return the speakers. Here's a pic BEFORE I chopped the square grid out of the speaker hole, and BEFORE I chopped the stantions:
PXL_20240416_190942950.jpg


You WILL have to cut the stantions that the speaker screws in to. This will allow the speaker to get closer to the grill, and AWAY from the metal. Check the next 2 pics: First is the stock speaker with it's plastic mount. (It reaches and seals against the speaker hole) . Seond pic is the MD B Quartz installed. I cut off 2 of the stantions, and the speakers squeezed between the other two.

PXL_20240414_180937040.jpg


PXL_20240727_160217216.jpg


Install the new speaker. When all 4 screws are tight, TEST THE SPEAKER. (BEFORE YOU REASSEMBLE everything!) Fish the 12’ speaker wire pigtail to the hatch area. MARK WHICH LEAD IS +!!!! (I forgot to.) Reinstall the panels.

OTHER THOUGHTS IN NO ORDER: I would love to repeatedly hit the engineer/beancounter who decided to plastic mount a speaker to a trim piece to save $1.28. POLARITY in super important with these 2 speakers. If they are out of phase, one’s sound waves will cancel out the other, as they fire directly at each other. Even NEW speaks sound like crap here. I don’t know if there is some inline resistor or capacitor I don’t know about.
 
Last edited:
OP
OP
Mugzilla

Mugzilla

Well-Known Member
First Name
Matt
Joined
Apr 4, 2024
Threads
56
Messages
595
Reaction score
656
Location
Short Hills, NJ
Car(s)
2024 Z Sport (MT)
Occupation
printer repair man
POWER to the rear:

While you have the passenger side door trim off, run a power wire.

Pic of the hole IN TO the car:


PXL_20240416_172358424.jpg


PXL_20240416_172408821.jpg


Pic of where it penetrates in to the cab:

PXL_20240416_172559951.jpg


Be careful of your routing behind the passenger seat! You can end up on the wrong side of the seatbelt, and not able to find a good way to the hatch area!
 
Last edited:
OP
OP
Mugzilla

Mugzilla

Well-Known Member
First Name
Matt
Joined
Apr 4, 2024
Threads
56
Messages
595
Reaction score
656
Location
Short Hills, NJ
Car(s)
2024 Z Sport (MT)
Occupation
printer repair man
Last edited:
OP
OP
Mugzilla

Mugzilla

Well-Known Member
First Name
Matt
Joined
Apr 4, 2024
Threads
56
Messages
595
Reaction score
656
Location
Short Hills, NJ
Car(s)
2024 Z Sport (MT)
Occupation
printer repair man
Final thoughts:

With everything installed, I STILL need to put it 60% or more to the rear to hear the rear speakers.

The dash speakers are CRISP and SHARP! Like I said, they made the biggest difference.

The door speakers. God, I wish I could have put 6x9s in there. BUT, I could not source a spacer ring to move them out from the door, and would have had to whip up a foam interface to sandwich btw the speakers and the door panel.

Rear speakers. I scraped so much flesh off trying to work with the side panel in the car. I HAVE to leave sound going to the "rear". Otherwise, by sub gets no high level input.
 
Last edited:

Outbid25500

New Member
First Name
Joe
Joined
Sep 10, 2024
Threads
0
Messages
4
Reaction score
10
Location
South Carolina
Car(s)
2024 Nissan Z.2015 Porsche Cayman.1991 BMW 325i.1993 Mazda RX7 FD.2018 Jeep wran
Occupation
Commercial Construction Industry
I think everyone feels the same regarding the sound system in the Z. However, it can amazing without spending too much if you are willing to do the work yourself. It took me a little trial and error to get it right. Even after replacing the rear speakers I was still underwhelmed with the sound quality. There just isn't enough room behind the panel, even with modifications, to fit anything larger than a slim 3.5 speaker. I decided to fabricate 2 small enclosures that fit in the shelf spaces behind the seats. This completely fixed the rear sound problem with the car. I know that most people won't like the look of them and you do give up storage space, but the sound quality is unbelievable. I also changed out the door and dash tweeters with focal components, threw an RF amplified sub in the back under the carpet, and wired in a DSP kicker amp. Total investment was only $900 and I can't belive how good it sounds!
20241025_122338.jpg
20241025_122419.jpg
20241025_122319.jpg
 

bpeckham

Well-Known Member
First Name
Bill
Joined
Feb 11, 2023
Threads
60
Messages
1,722
Reaction score
1,977
Location
San Diego
Car(s)
2023 Z Performance 6MT Blue/Graphite
This looks really clean. I find myself never using the shelves (perhaps because there's no easy way to quickly flip the seat back all the way forward). This seems like a better use of the space. Do you have any photos of the enclosures pre-install?
 

Outbid25500

New Member
First Name
Joe
Joined
Sep 10, 2024
Threads
0
Messages
4
Reaction score
10
Location
South Carolina
Car(s)
2024 Nissan Z.2015 Porsche Cayman.1991 BMW 325i.1993 Mazda RX7 FD.2018 Jeep wran
Occupation
Commercial Construction Industry
They are a little tricky to make but not impossible. I used 3/4 inch PVC board, but MDF would work fine. I removed the oem shelf floor and made upright supports that used the existing mounting points for the rear panels. When you remove the shelf ( they just pop out) you will see what i mean. I glued and screwed everything together and then put some black automotive carpet on it that matched the cars interior. Please excuse the amateur nature of my drawing. I'm not an artist and the angle is far from accurate, but I don't have time to pull the enclosure out right now.

20241025_162140.jpg
 
OP
OP
Mugzilla

Mugzilla

Well-Known Member
First Name
Matt
Joined
Apr 4, 2024
Threads
56
Messages
595
Reaction score
656
Location
Short Hills, NJ
Car(s)
2024 Z Sport (MT)
Occupation
printer repair man
@Outbid25500

SHUT UP AND TAKE MY MONEY!

But yes, I do tuck my backpack behind my seat, and tuck small things behind the passenger seat when I just jump in.

Also, with the sub mounted down there, does the floor cover and carpet block and dampen a ny of the bass?
 

Outbid25500

New Member
First Name
Joe
Joined
Sep 10, 2024
Threads
0
Messages
4
Reaction score
10
Location
South Carolina
Car(s)
2024 Nissan Z.2015 Porsche Cayman.1991 BMW 325i.1993 Mazda RX7 FD.2018 Jeep wran
Occupation
Commercial Construction Industry
I would have to think that the carpet and mat must block some of the sound from the sub, but it sounds clean and clear to me. When I first installed it my intention was to listen to it with and without the mat, but it sounded so good that I didn't try it without the mat. As a matter of fact, there is the plastic cover, the standard mat, and the optional Z carpet on top of it. I'll take them off tomorrow and let you know.
 

Cdgreencd87

Member
First Name
Chris
Joined
Jul 13, 2024
Threads
0
Messages
14
Reaction score
12
Location
Florida
Car(s)
Nissan Z
I did add 6×9 for the doors. I went with JL Audio and used the factory spacer (removing the speaker which has its own bracket but leaving that piece pictured above) and a speaker bracket (Metra 82-7402). I also did 3.5 JL in side panel. I did not change out the dash ones but planned to. I got the JL 1in dome tweeters and saw they were way smaller and I could fit larger as you called out. The sound replacing those 4 speakers have been huge. I do a 60/40 front to rear fade.

There are speaker harness options so you don't have to cut factory wiring. Always zip tie those together for anyone who hasn't used them before.
 
OP
OP
Mugzilla

Mugzilla

Well-Known Member
First Name
Matt
Joined
Apr 4, 2024
Threads
56
Messages
595
Reaction score
656
Location
Short Hills, NJ
Car(s)
2024 Z Sport (MT)
Occupation
printer repair man
Can you post some pics and a tutorial of your work in this thread?
 

Cdgreencd87

Member
First Name
Chris
Joined
Jul 13, 2024
Threads
0
Messages
14
Reaction score
12
Location
Florida
Car(s)
Nissan Z
Can you post some pics and a tutorial of your work in this thread?
Your above photos and process were exactly what I did. Unfortunately I didn't know about the spacers and threw away one away. Luckily I had the factory ones to use. The magnetic gets in the way of the door arm without a spacer so make sure you use the factory piece or get one.


Top